
Every time you install a program, update Windows, browse the web, or even just use your PC normally, small temporary files quietly pile up in the background. Individually they’re nothing to worry about, but over months or years, they can add up to several gigabytes of space you didn’t realize was gone. The good news is Windows 11 makes cleaning these out pretty painless, with a few different built in tools depending on how thorough you want to be.
Here’s everything you need to know about clearing out temporary files safely.
What Are Temporary Files, Exactly?
Temporary files are created by Windows, apps, and your browser to help things run smoothly, things like cached data that speeds up loading, leftover files from installations and updates, and error report logs. They’re meant to be short lived, but a lot of them never get cleaned up automatically, which is exactly why they accumulate over time.
Common sources include Windows Update leftovers, temporary internet files from browsing, delivery optimization files ( used when Windows shares update data between devices ), and error reporting or crash dump files. None of these are things you actively need day to day, which is why removing them is generally very safe.
Method 1: Use Storage Sense ( Easiest, Can Run Automatically )
Storage Sense is Windows 11’s built in cleanup tool, and it’s the easiest way to handle this without thinking about it again.
- Open Settings ( Windows key + I )
- Go to System > Storage
- Click Temporary files to see exactly what’s currently taking up space
- Check the boxes next to the categories you want to remove (Windows Update Cleanup, Temporary files, Recycle Bin, Downloads, etc.)
- Click Remove files
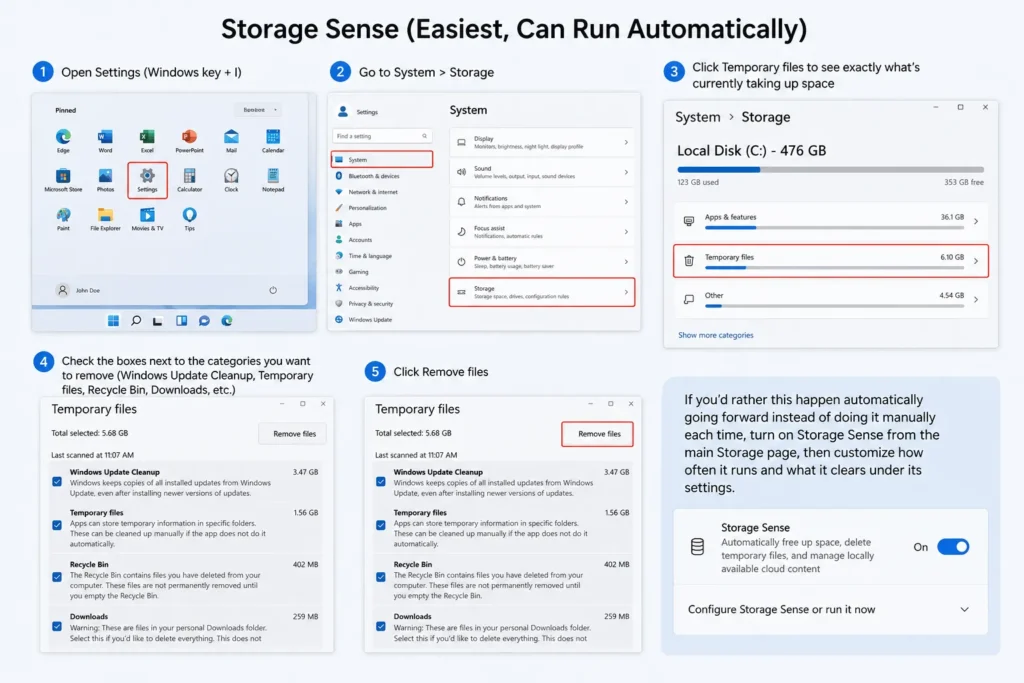
If you’d rather this happen automatically going forward instead of doing it manually each time, turn on Storage Sense from the main Storage page, then customize how often it runs and what it clears under its settings.
Method 2: Use Disk Cleanup (Classic Tool, Still Works Great)
Disk Cleanup has been part of Windows for years, and it’s still a solid, fast option for clearing out temporary files.
- Search for Disk Cleanup in the Start menu and open it
- Select your main drive (usually C:) and click OK
- Wait for it to calculate how much space can be freed
- Check the boxes next to the categories you want to remove
- Click Clean up system files for a more thorough scan that includes Windows Update leftovers and system-level temp files
- Select your drive again, review the expanded list, and click OK, then confirm
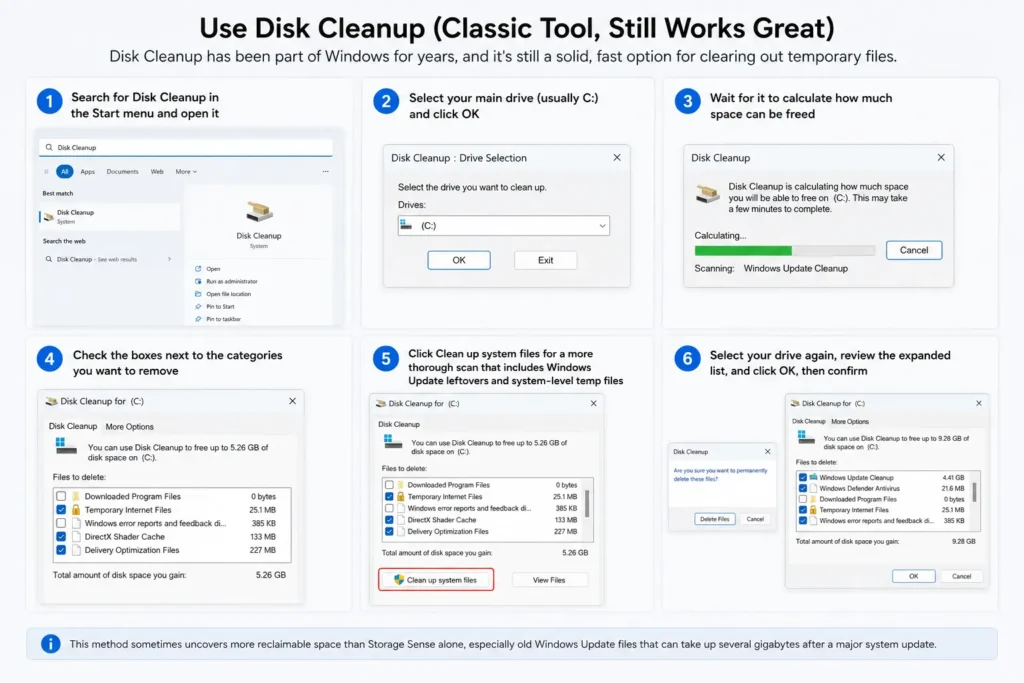
This method sometimes uncovers more reclaimable space than Storage Sense alone, especially old Windows Update files that can take up several gigabytes after a major system update.
Method 3: Manually Delete the Temp Folder
If you want a more direct, hands-on approach, Windows keeps a dedicated temporary files folder you can clear out manually.
- Press Windows key + R to open Run
- Type
%temp%and press Enter - Select all files (Ctrl + A) and press Delete
- Some files may show a message saying they’re in use and can’t be deleted, this is normal, just skip those and continue
Windows will only let you delete files that aren’t currently being used by an active program, so it’s safe to select everything and let it skip whatever it can’t remove.
Method 4: Clear Browser Cache and Temporary Internet Files
Browsers keep their own separate cache of temporary files, which Windows’ built in cleanup tools don’t always fully address.
In Chrome: Go to Settings > Privacy and security > Clear browsing data, select Cached images and files, choose your time range, and click Clear data.
In Edge: Go to Settings > Privacy, search, and services > Clear browsing data, select Cached images and files, and click Clear now.
In Firefox: Go to Settings > Privacy & Security, scroll to Cookies and Site Data, and click Clear Data.
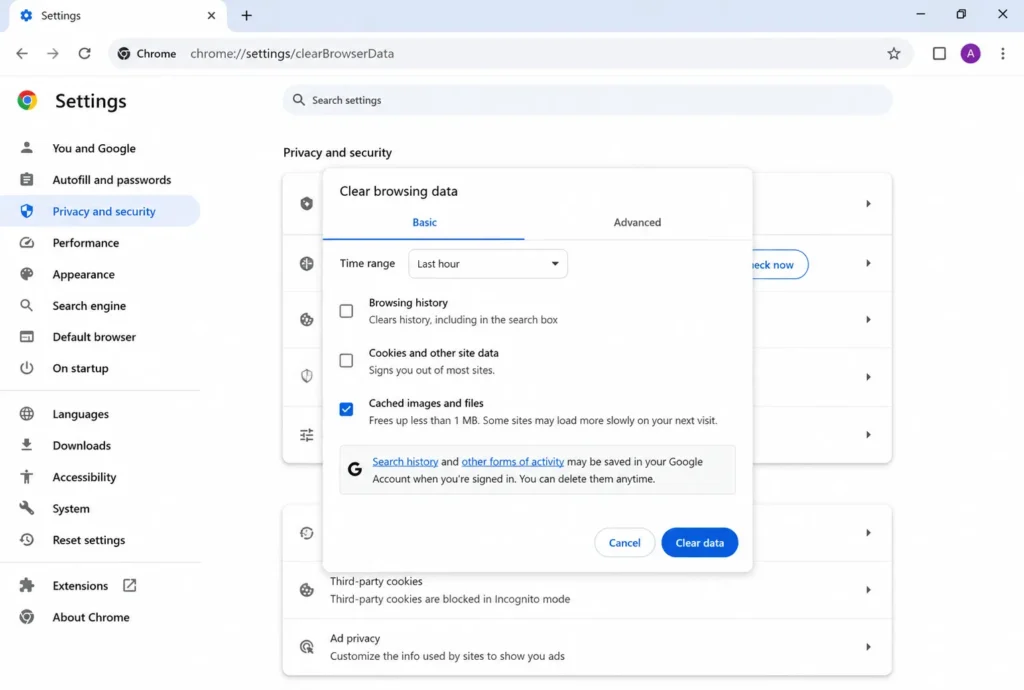
Since browser cache can genuinely add up to several gigabytes if you browse a lot, this is worth doing periodically alongside the Windows-level cleanup methods above.
Method 5: Remove Windows Update Cleanup Files
After a major Windows update, old system files sometimes stick around for a while in case you need to roll back, and these can take up a surprising amount of space if left unchecked.
- Open Disk Cleanup ( as covered in Method 2 )
- Click Clean up system files
- Look specifically for Windows Update Cleanup and Previous Windows installation(s ) in the list
- Check these boxes and click OK
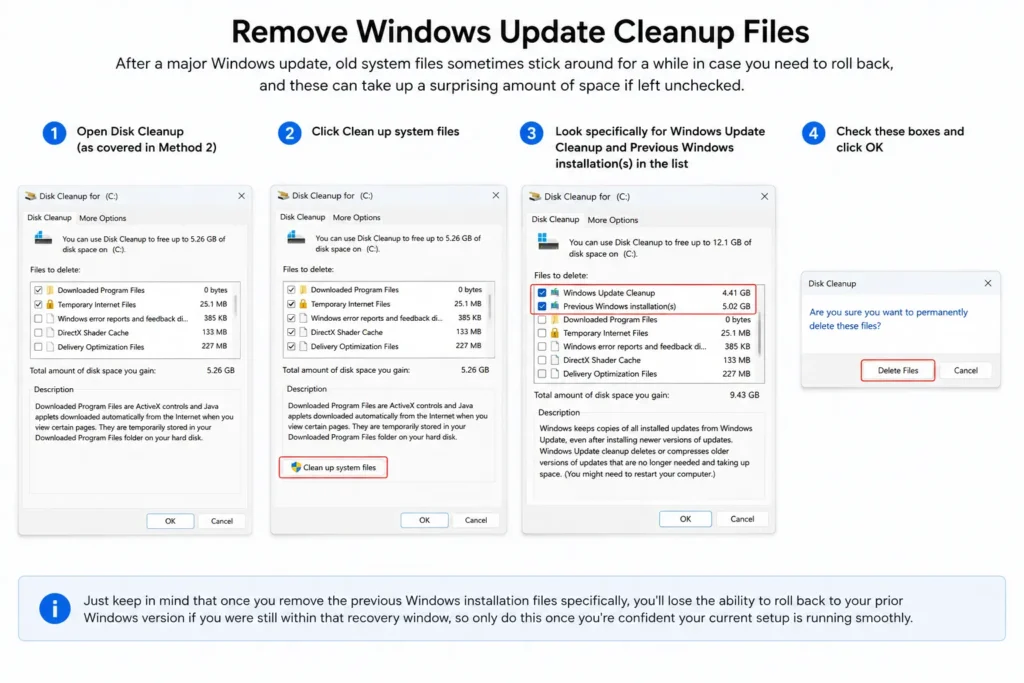
Just keep in mind that once you remove the previous Windows installation files specifically, you’ll lose the ability to roll back to your prior Windows version if you were still within that recovery window, so only do this once you’re confident your current setup is running smoothly.
What to Do If Storage Sense or Disk Cleanup Doesn’t Free Up Much Space
Occasionally, people run through these cleanup methods expecting to recover several gigabytes and end up disappointed with the results, which usually means the space is being taken up by something other than typical temporary files.
If cleanup barely makes a dent, it’s worth checking whether large personal files (like videos, photos, or downloaded installers) are the actual culprit rather than temp files, since these often account for far more space than temporary system files ever do, a duplicate file finder or disk space analyzer tool can help pinpoint this more precisely. It’s also worth checking whether hibernation is enabled, since the hibernation file (hiberfil.sys) can take up several gigabytes on its own and isn’t touched by standard temporary file cleanup, this can be disabled through Command Prompt using powercfg /hibernate off if you don’t use the hibernate feature. Lastly, if you recently ran Disk Cleanup’s “Clean up system files” option and Windows Update Cleanup still shows a large size, it sometimes needs a restart before the freed space is actually reflected in your total available storage, so checking again after rebooting is worth doing before assuming the cleanup didn’t work.
Is It Safe to Delete All Temporary Files?
Generally, yes, temporary files are designed to be disposable, and Windows itself will simply regenerate what it actually needs going forward. That said, a couple of caveats are worth knowing: if you delete files while a program is actively using them, that specific file may just get skipped rather than causing any real problem, and removing “Previous Windows installation” files (mentioned in Method 5) does remove your ability to roll back to an earlier Windows version, so that one is worth being intentional about rather than blindly deleting everything system cleanup offers.
Beyond those specific exceptions, temporary files are one of the safest categories of files to clean up regularly, unlike deleting random files from your Documents or Downloads folder, where you actually need to think about what you’re removing.
How Much Space Can You Expect to Recover?
This varies a lot depending on how long it’s been since your last cleanup and how you use your PC, but it’s common for a first-time cleanup to recover anywhere from a few hundred megabytes to several gigabytes, especially if you haven’t cleared Windows Update leftovers in a while or you do a lot of daily browsing. If your PC recently went through a major Windows feature update, checking specifically for “Previous Windows installations” in Disk Cleanup often reveals the single largest chunk of reclaimable space, sometimes 10-20GB on its own.
Setting Up Automatic Cleanup So You Don’t Have to Remember
Rather than manually clearing temporary files every so often, it’s worth setting up Storage Sense to handle this automatically going forward.
- Go to Settings > System > Storage
- Turn on Storage Sense
- Click into its settings and set how often you’d like it to run (Daily, Weekly, Monthly, or based on low disk space)
- Choose which categories it should automatically clean, including temporary files and Recycle Bin contents
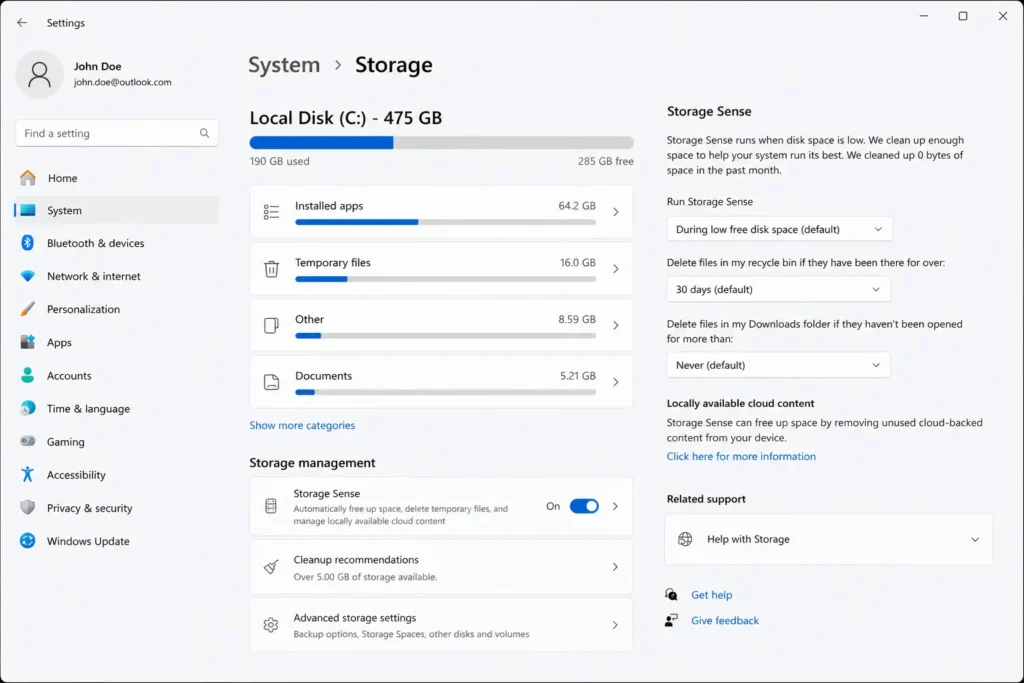
Once configured, this quietly keeps things tidy in the background without needing you to remember to do it manually every few months.
Frequently Asked Questions
Will deleting temporary files delete anything important, like my documents or photos?
No, temporary files are stored separately from your personal files and are specifically meant to be disposable. None of the methods covered in this guide touch your documents, photos, or other personal files unless you specifically select those categories (like Downloads) during a Storage Sense or Disk Cleanup session.
Do I need to restart my PC after clearing temporary files?
Not usually, though restarting occasionally helps clear out any temporary files that were locked because a program was using them at the time of cleanup, since those files become deletable again once the related program or process has fully closed.
Why do temporary files keep building up even after I clean them?
This is completely normal, temporary files are constantly being created as part of how Windows, your browser, and installed apps function day to day. The goal isn’t to prevent them from ever accumulating, it’s just to periodically clear out what’s built up, which is exactly why setting up automatic cleanup through Storage Sense is worth doing.
Is cleaning temporary files the same as running a full disk cleanup for performance?
Not entirely. Clearing temporary files frees up storage space, but it doesn’t necessarily fix broader performance issues on its own. If you’re looking to improve overall PC speed rather than just storage space, it’s worth also checking background programs, startup apps, and available RAM, alongside regular temporary file cleanup.
Keep Your Windows 11 Storage Clean
Clearing out temporary files in Windows 11 is one of the easiest, safest ways to reclaim storage space, and setting up Storage Sense means you really only have to think about it once. Whether you use the quick built in Storage Sense tool, the more thorough Disk Cleanup utility, or clear out your browser cache separately, a few minutes of cleanup can genuinely free up several gigabytes you didn’t realize you’d lost to files you’ll never actually miss.