
Windows doesn’t have a simple right click “Lock This Folder” option the way you might expect, which surprises a lot of people the first time they go looking for one. That doesn’t mean you’re out of luck, though. There are a few legitimate built in ways to restrict access to a specific folder without installing any extra software, ranging from a quick trick using Command Prompt to more robust options like encryption and user permissions, depending on how serious you actually need the protection to be.
Here’s a full rundown of your options, from the simplest to the most secure.
Understanding What “Locking a Folder” Actually Means
Before diving into methods, it’s worth understanding there’s a real difference between hiding a folder, restricting who can open it, and actually encrypting it so the contents can’t be read even if someone gets past the lock itself. Some of the methods below are more like a basic deterrent (good for keeping a sibling or coworker from casually stumbling onto something), while others offer genuine security against someone determined to get in. Picking the right method really depends on what you’re actually trying to protect against.
Method 1: Lock a Folder Using Command Prompt (Quick and Free)
This is the most popular built-in trick, and it works by changing the folder into a system file, making it disappear from normal view entirely rather than just password protecting it.
- Open the folder where you want to create your locked folder
- Right click, select New > Text Document
- Open the new text file and paste in the following code:
cls
@ECHO OFF
title Folder Locker
if EXIST "Locker" goto UNLOCK
if NOT EXIST Private goto MDLOCKER

:CONFIRM
echo Are you sure you want to lock the folder? (Y/N)
set/p "cho=>"
if %cho%==Y goto LOCK
if %cho%==y goto LOCK
if %cho%==n goto END
if %cho%==N goto END
echo Invalid choice.
goto CONFIRM

:LOCK
ren Private "Locker"
attrib +h +s "Locker"
echo Folder locked
goto End

:UNLOCK
echo Enter password to unlock folder
set/p "pass=>"
if NOT %pass%==YourPasswordHere goto FAIL
attrib -h -s "Locker"
ren "Locker" Private
echo Folder unlocked successfully
goto End

:FAIL
echo Invalid password
goto end

:MDLOCKER
md Private
echo Private folder created successfully
goto End

:End
- Replace YourPasswordHere in the code with whatever password you actually want to use
- Save the file, then rename it to locker.bat (make sure the file extension changes from .txt to .bat)
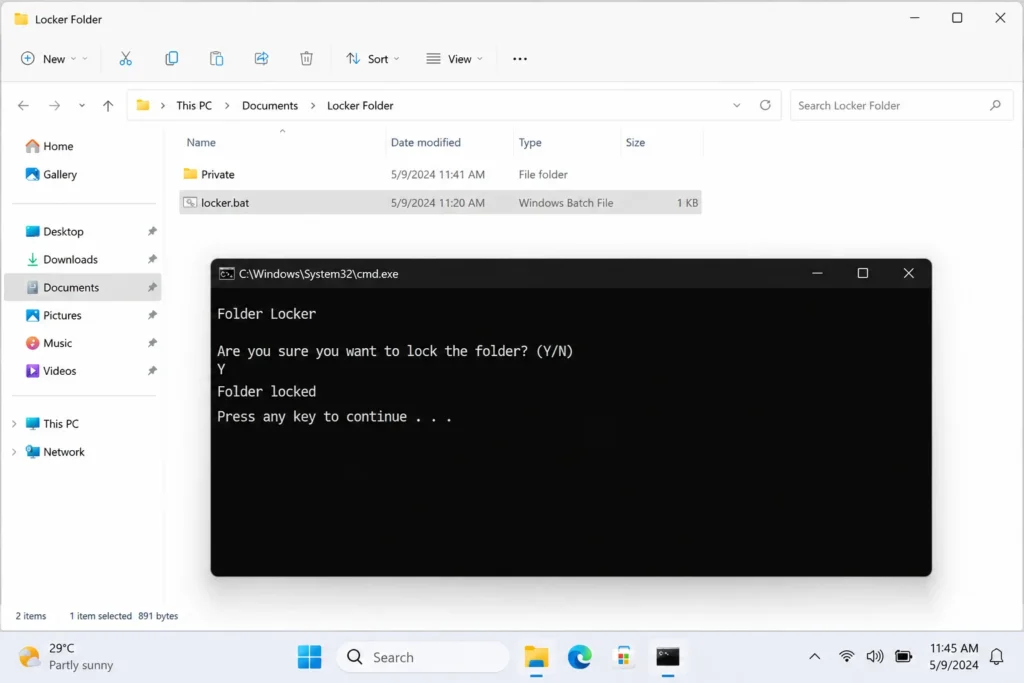
- Double click locker.bat, this creates a new folder called “Private“
- Move whatever files you want to protect into the Private folder
- Double-click locker.bat again, type Y when prompted to confirm locking, and the folder will disappear from view
- To unlock it later, double click locker.bat again and enter your password when prompted
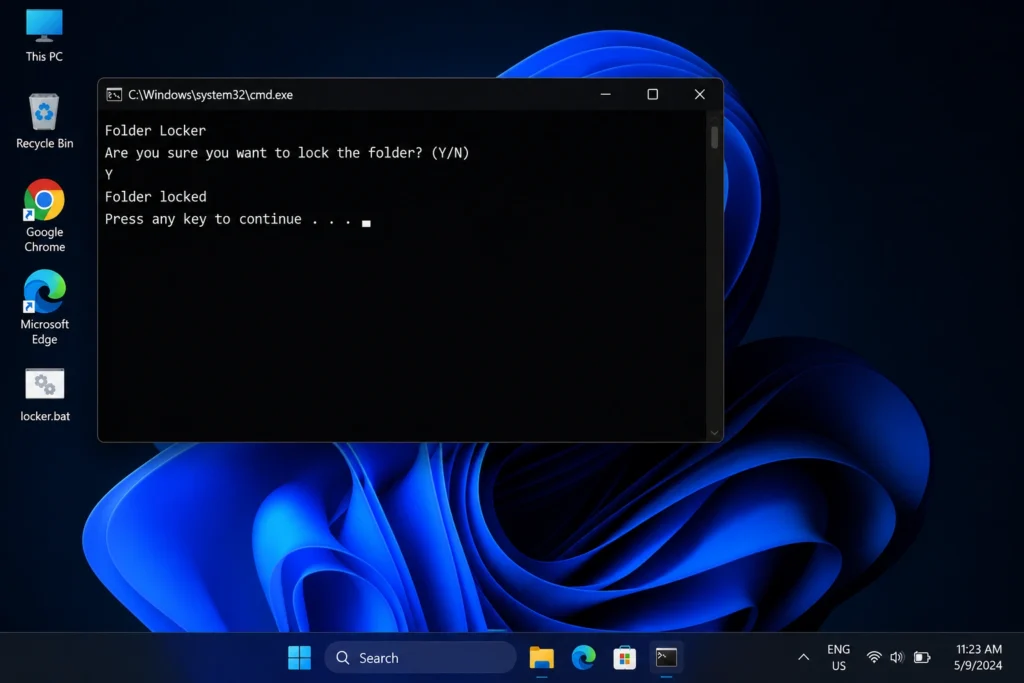
This method works by hiding the folder as a protected system file rather than truly encrypting it, so while it’s effective against casual snooping, it’s not something that would stop someone with more technical knowledge of Windows.
Method 2: Encrypt a Folder Using Windows Built In EFS Encryption
If you want something genuinely more secure than hiding a folder, Windows Pro and Enterprise editions include a built in encryption feature called EFS (Encrypting File System), which actually encrypts the contents so they can’t be read without your Windows user account.
- Right click the folder you want to protect and select Properties
- On the General tab, click Advanced
- Check the box for Encrypt contents to secure data
- Click OK, then Apply
- Choose whether to apply this to the folder only or to all subfolders and files within it, then click OK
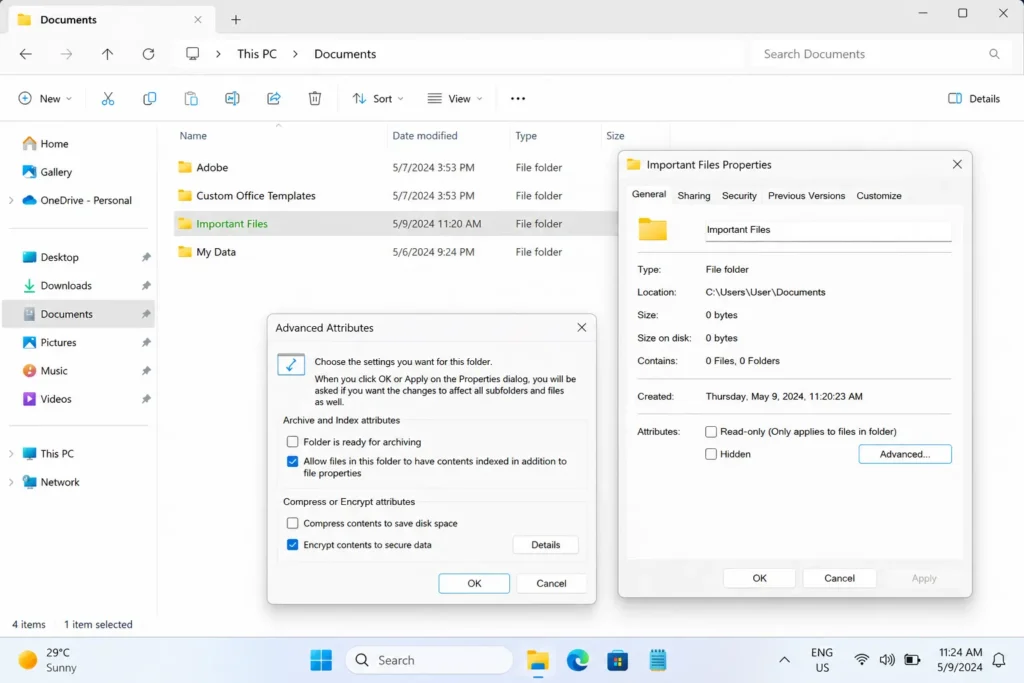
Once encrypted, the folder typically appears with green text in File Explorer, indicating it’s protected. Since this encryption is tied to your specific Windows user account, the files become unreadable to anyone who doesn’t have access to that same account, even if they remove the drive and try to access it from another computer.
Important note: Back up your encryption certificate after enabling this (Windows will usually prompt you to). If your user account or Windows installation ever gets corrupted without a backup, encrypted files can become permanently inaccessible, even to you.
Method 3: Restrict Folder Access Through NTFS Permissions
If you share your PC with other users who each have their own Windows account, you can restrict a specific folder so only your account can open it, without needing a separate password at all.
- Right click the folder and select Properties
- Go to the Security tab
- Click Edit
- Select the user account(s) you want to remove access for
- Click Remove, or uncheck the relevant permission boxes (Read, Write, Modify) for that user
- Click Apply, then OK
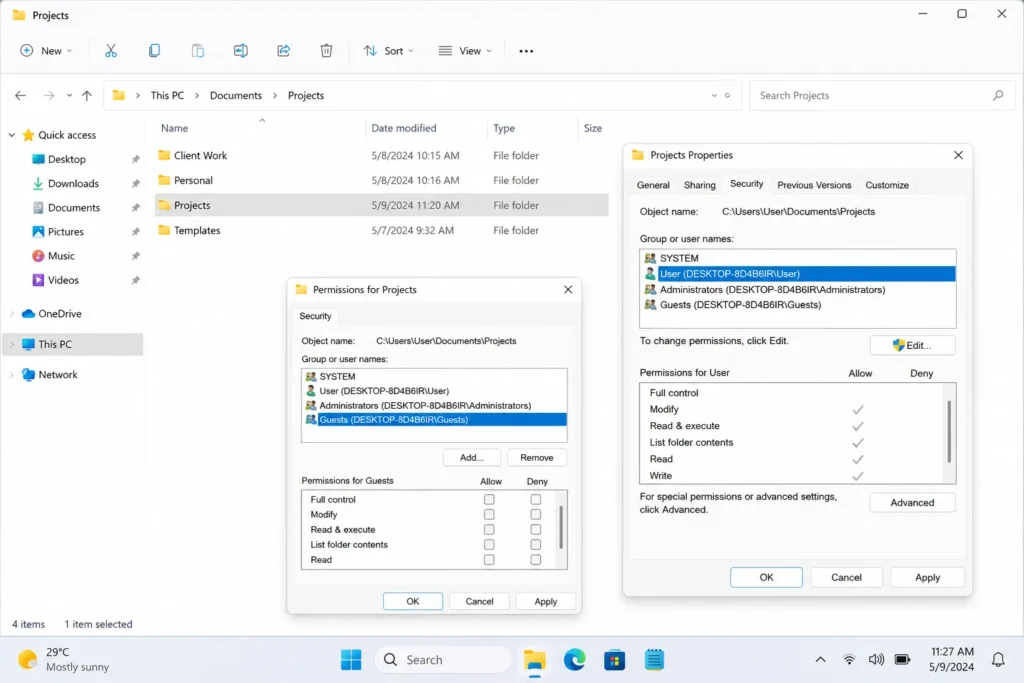
This is particularly useful on a shared family or work computer, since it restricts access based on which Windows account is currently logged in, rather than relying on a password that could potentially be shared or guessed.
Method 4: Compress the Folder Into a Password Protected ZIP
Windows’ native ZIP compression tool doesn’t support passwords, but you can use PowerShell alongside a password-protected approach for an additional layer of security without installing dedicated locking software. That said, if password protection specifically is your main goal, it’s often simpler to use 7-Zip ( a free, well established tool, though technically third party ) since Windows’ own built in ZIP genuinely lacks a password option entirely.
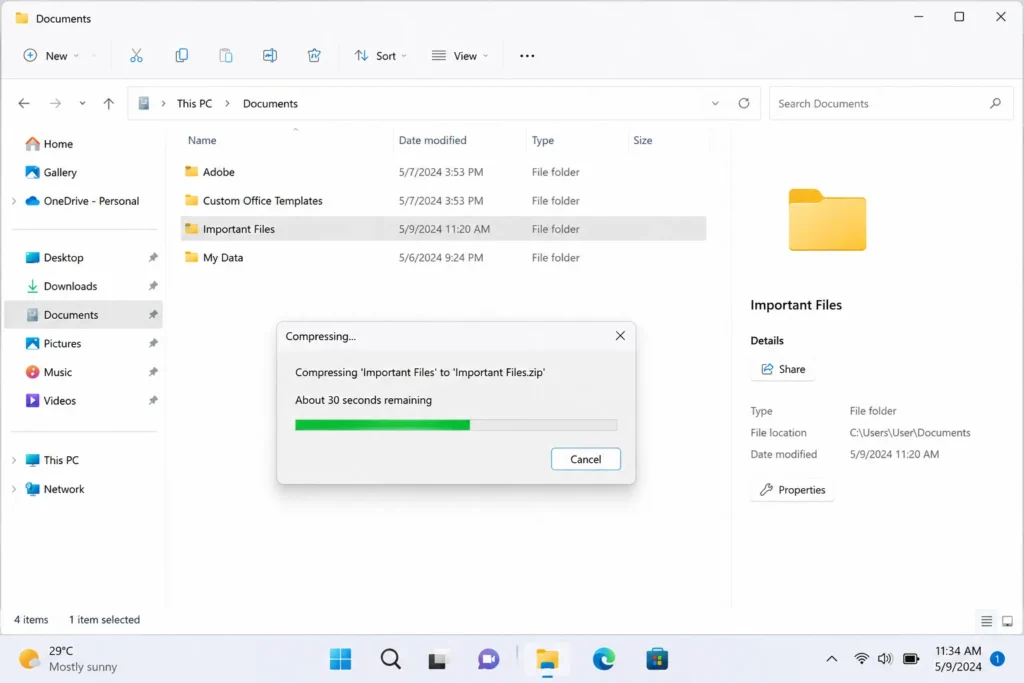
If you specifically need to stay within built in Windows tools only, combining Method 2 ( EFS encryption ) with Method 3 ( restricted permissions ) offers a more complete, fully built in solution than trying to work around ZIP’s password limitations.
Troubleshooting the Command Prompt (Batch File) Method
This method works well for most people, but a few common issues trip people up the first time they try it, so it’s worth knowing what to check if something doesn’t go as expected.
If double-clicking locker.bat doesn’t seem to do anything, make sure the file extension actually changed from .txt to .bat, sometimes Windows keeps the .txt extension hidden by default, resulting in a file that’s technically still a text document rather than a batch file. You can check this by going to File Explorer > View > Show > File name extensions to make sure extensions are visible, then confirming the file genuinely ends in .bat. If you get an error saying the password doesn’t match even though you’re sure you’re typing it correctly, double check that you edited the exact line in the code (if NOT %pass%==YourPasswordHere goto FAIL) and replaced it precisely, since even an extra space or accidental character change can cause the password check to fail. If your antivirus software flags or blocks the batch file, this is a fairly common false positive with these scripts, since batch files that hide folders can resemble the behavior of certain malware, temporarily allowing the file through your antivirus ( only if you’re confident in what the script does ) usually resolves it.
Locking Individual Files Instead of a Whole Folder
Sometimes you don’t need to protect an entire folder, just one specific sensitive file, like a single document or spreadsheet, without wanting to build out a whole separate protected folder structure for it.
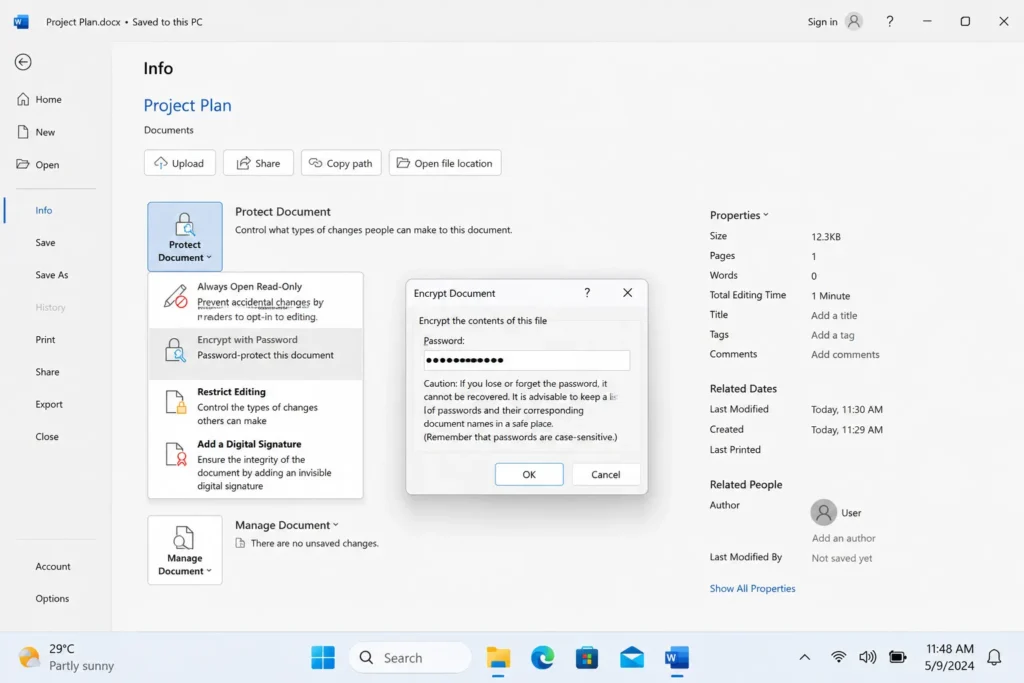
For a single file, Microsoft Office documents ( Word, Excel, PowerPoint ) have their own built in password protection that doesn’t require any of the folder-level methods above. Open the file, go to File > Info > Protect Document ( or Protect Workbook/Presentation depending on the app ), and choose Encrypt with Password. This adds a password requirement specifically to that one file, which travels with it even if it’s copied, emailed, or moved somewhere else, unlike folder level protection, which only applies while the file stays within that specific protected folder. For non Office files, like a single PDF or image you want to protect individually, placing just that one file inside an EFS encrypted folder ( Method 2 above ) is generally the simplest built in option available.
Which Method Should You Actually Use?
This depends entirely on what you’re protecting against:
- Casual privacy from family members or roommates — Method 1 ( the Command Prompt trick ) is quick and does the job for basic situations
- Genuine data security, like tax documents or sensitive personal files — Method 2 (EFS encryption) offers real protection since the data itself becomes unreadable without your account
- Shared computers with multiple Windows accounts — Method 3 ( NTFS permissions ) is the cleanest option, since it ties access directly to whoever is logged in
For most people just wanting some basic privacy, Method 1 covers the need. If you’re dealing with something genuinely sensitive, like financial records or personal documents you’d be seriously upset to have exposed, it’s worth taking the extra few minutes to set up EFS encryption instead.
A Few Limitations Worth Knowing About
None of these built-in methods are completely foolproof, and it’s worth having realistic expectations:
- The Command Prompt method ( Method 1 ) can be bypassed by anyone who knows to enable “Show hidden files and folders” in File Explorer settings and knows the folder name, since it relies on hiding rather than true encryption
- EFS encryption is tied to your specific Windows account, so if someone gains access to your logged in account, the encryption itself won’t stop them
- None of these methods protect against someone with administrator access to the PC, who can generally reset permissions or access encrypted files through advanced recovery methods if they’re determined enough
For truly sensitive information, especially anything financial or highly personal, combining one of these methods with a strong Windows account password and BitLocker drive encryption ( if your Windows edition supports it ) offers a much more complete layer of protection than folder level tricks alone.
Frequently Asked Questions
Will the Command Prompt method work if I copy the batch file to another computer?
No, the batch file needs to be run from within the same folder location it originally created the “Private” folder in, and the “Locker” folder itself needs to remain in that same location for the unlock process to work correctly.
Can I recover files if I forget my EFS encryption password?
Not through your Windows password alone. EFS relies on your account’s certificate rather than a separate password you type each time, this is exactly why backing up your encryption certificate when Windows prompts you to is so important, since losing access to your account without that backup can mean permanently losing access to the encrypted files.
Does locking a folder this way protect it if my laptop gets stolen?
Only partially. Someone would need to bypass your Windows login first for account-based methods like EFS or NTFS permissions to matter, but if your laptop doesn’t have a strong login password or BitLocker drive encryption enabled, someone with physical access and enough technical knowledge could still potentially access files through other means, like booting from an external drive.
Is it illegal to lock folders on my own computer?
Not at all, this is a completely normal and legal way to protect your own privacy and data on a device you own. These methods are commonly used for personal privacy, protecting sensitive documents, or simply keeping shared computers organized between different users.