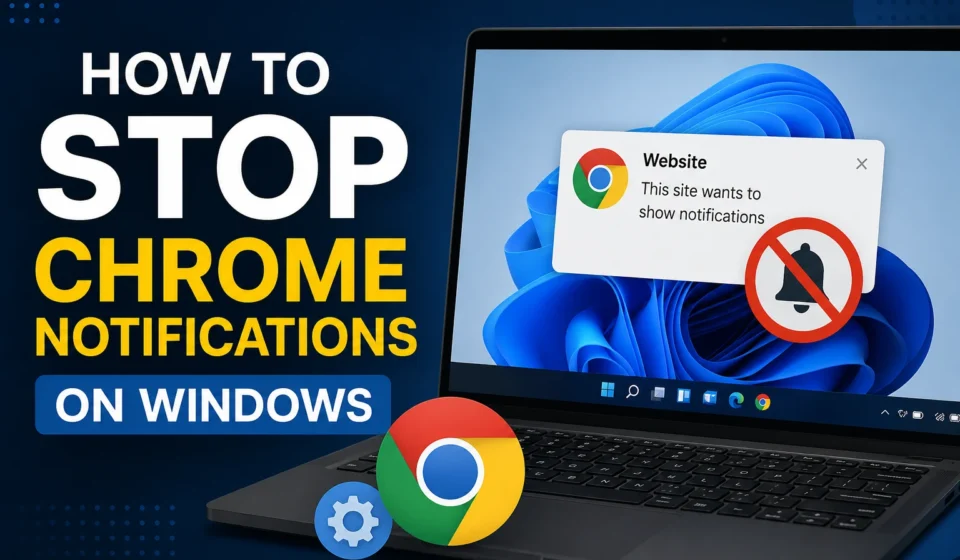

If you’ve ever clicked “Allow” on a website’s notification popup without really thinking about it, only to find yourself getting random alerts about “breaking news” or a sale at a site you visited once months ago, you’re not alone. Chrome notifications can pile up quickly, and once several sites have permission, they can genuinely make your Windows notification tray feel cluttered and distracting. The good news is stopping them, whether from one specific site or completely across the board, takes just a couple of minutes.
Here’s how to get control over this properly, along with why it happens in the first place.
Why Chrome Asks for Notification Permission in the First Place
It helps to understand what’s actually going on here. Many websites, especially news sites, blogs, and online stores, use a legitimate browser feature called push notifications to send you updates even when you’re not actively on their site, similar to how a phone app might notify you. When you first visit certain sites, Chrome shows a popup asking whether you want to allow this, and it’s easy to click “Allow” out of habit or without fully reading what you’re agreeing to.
Over time, as you visit more sites and click through these prompts without much thought, you can end up with a long list of websites that have permission to send you notifications, many of which you probably don’t even remember granting access to.
Method 1: Stop Notifications From a Specific Website
If it’s just one or two particular sites causing the annoyance, rather than a broader problem, this is the quickest targeted fix.
- Open Chrome and click the three dot menu in the top right corner
- Go to Settings
- Click Privacy and security, then Site settings
- Click Notifications
- Under Allowed to send notifications, find the specific site you want to block
- Click the three dot menu next to that site and select Remove, or click on the site directly and change the permission to Block
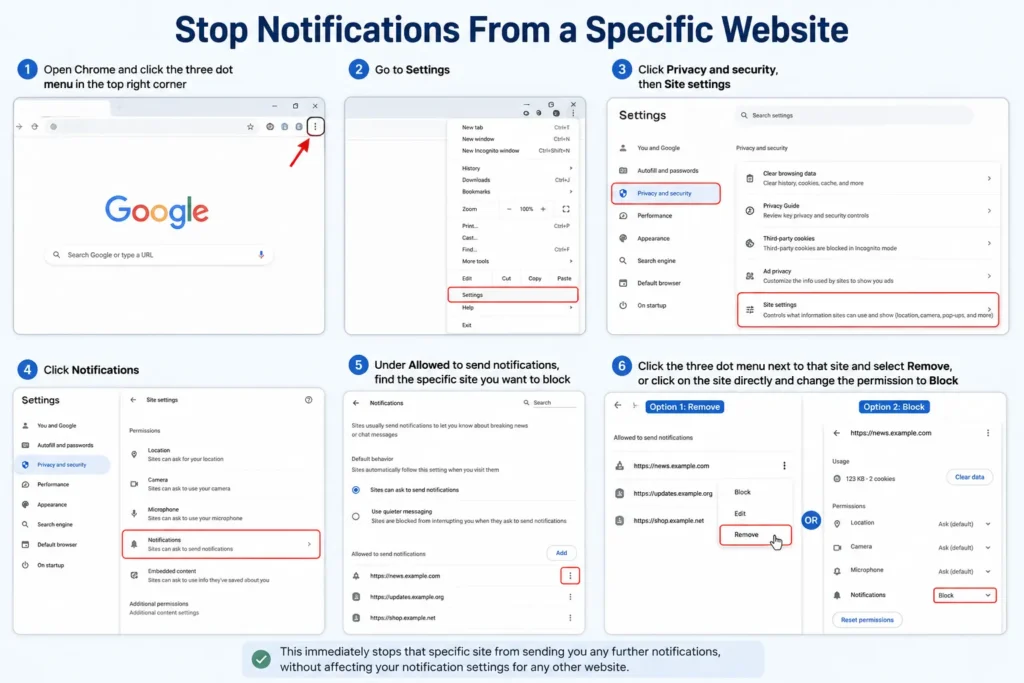
This immediately stops that specific site from sending you any further notifications, without affecting your notification settings for any other website.
Method 2: Stop All Chrome Notifications Completely
If you’d rather not deal with individual sites and just want notifications turned off across the board, this handles everything in one setting.
- Open Chrome Settings (three dot menu > Settings)
- Go to Privacy and security > Site settings
- Click Notifications
- Turn off Sites can ask to send notifications, or select the option to have sites not be able to send notifications at all
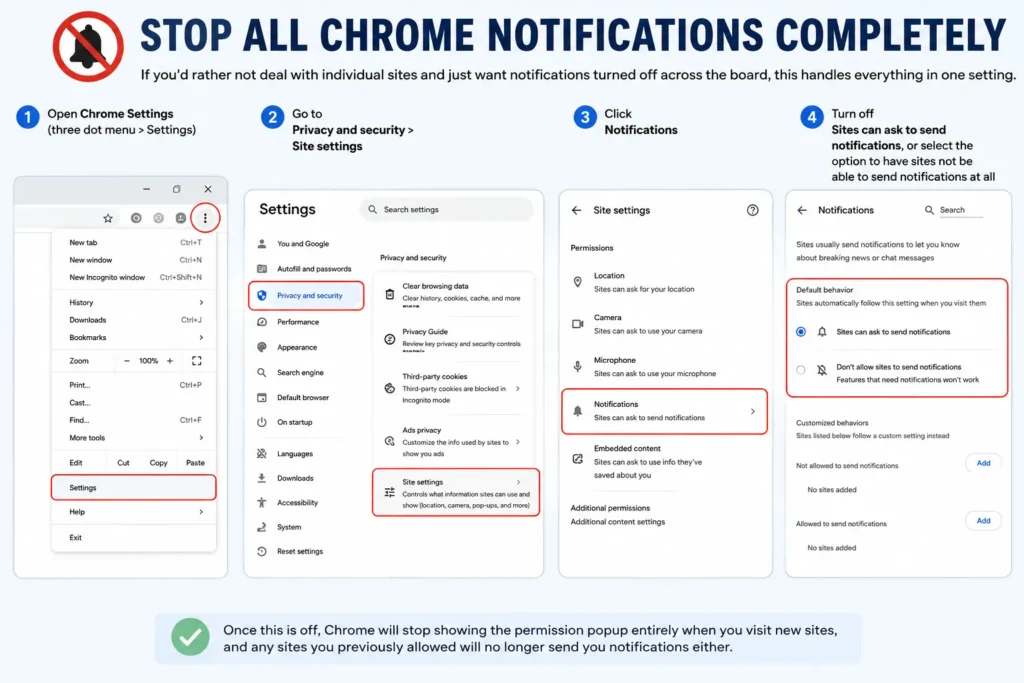
Once this is off, Chrome will stop showing the permission popup entirely when you visit new sites, and any sites you previously allowed will no longer send you notifications either.
Method 3: Block the Notification Permission Popup Itself
Even if you don’t mind some sites sending notifications, the popup asking for permission can itself be disruptive if it shows up constantly while you’re browsing. Chrome has a setting specifically to quiet this down without fully disabling notifications as a feature.
- Go to Chrome Settings > Privacy and security > Site settings > Notifications
- Look for the option labeled Use quieter messaging ( or a similar wording depending on your Chrome version )
- Turn this on
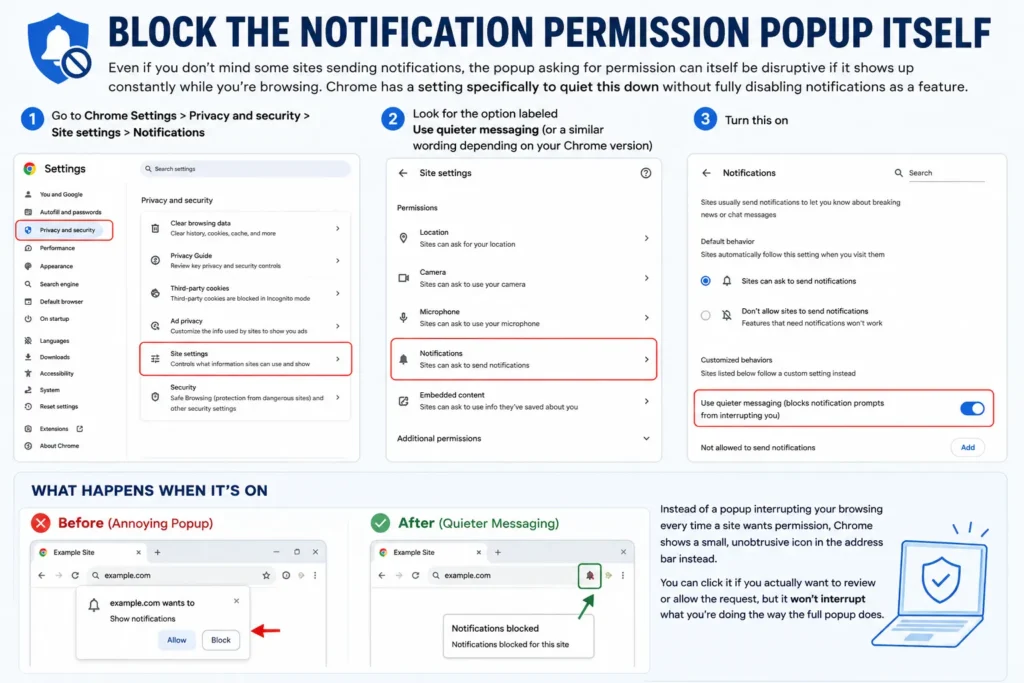
With this enabled, instead of a popup interrupting your browsing every time a site wants permission, Chrome shows a small, unobtrusive icon in the address bar instead. You can click it if you actually want to review or allow the request, but it won’t interrupt what you’re doing the way the full popup does.
Method 4: Turn Off Chrome Notifications at the Windows Level
Even after adjusting Chrome’s own settings, you can add another layer of control directly through Windows itself, useful if you want Chrome notifications silenced without changing anything inside Chrome’s own settings.
- Open Settings ( Windows key + I )
- Go to System > Notifications
- Scroll down to find Google Chrome in the list of apps
- Turn off the toggle next to Chrome, or click into it for more granular options, like turning off sound specifically while still allowing notifications to appear silently
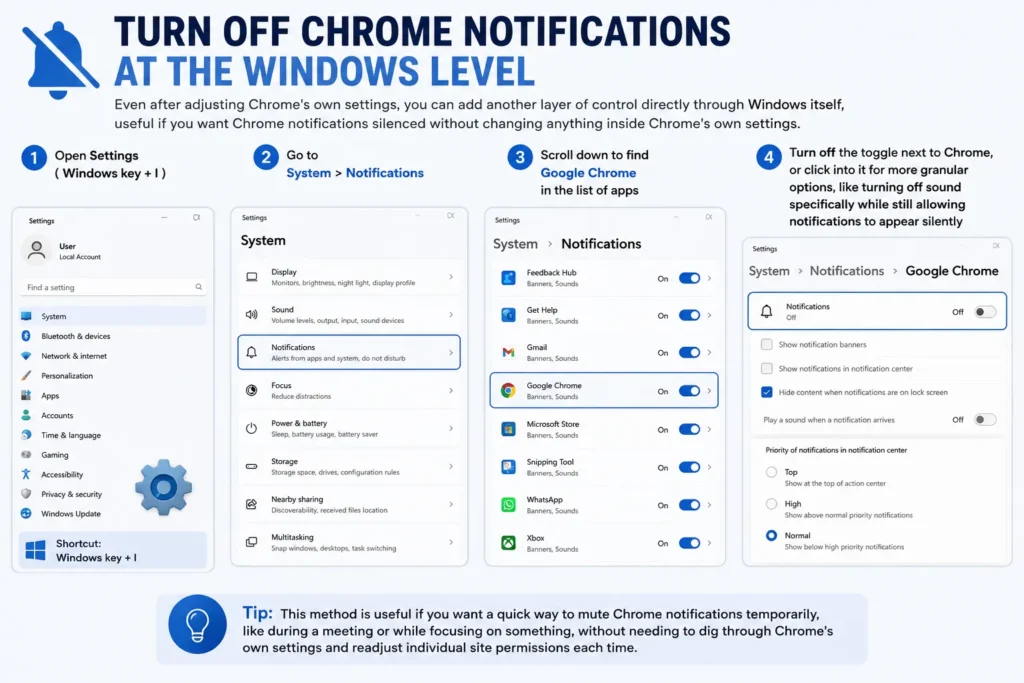
This method is useful if you want a quick way to mute Chrome notifications temporarily, like during a meeting or while focusing on something, without needing to dig through Chrome’s own settings and readjust individual site permissions each time.
Reviewing Which Sites Currently Have Notification Permission
Before blocking everything outright, it’s worth taking a minute to actually see the full list of sites that currently have permission, since you may be surprised by how many have accumulated over time without you really noticing.
Head back to Chrome Settings > Privacy and security > Site settings > Notifications, and look under the Allowed to send notifications section. This shows every site you’ve granted permission to, giving you the chance to selectively remove specific ones you don’t actually want anymore while leaving a few legitimately useful ones in place, like a delivery tracking site or a work-related tool you actually rely on getting real-time updates from.
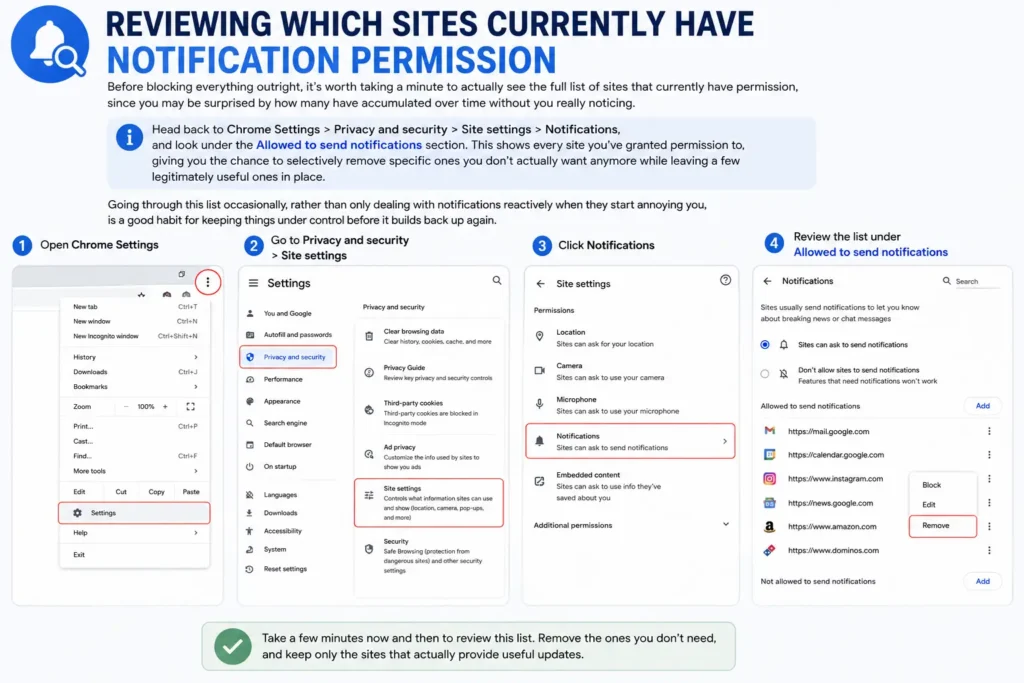
Going through this list occasionally, rather than only dealing with notifications reactively when they start annoying you, is a good habit for keeping things under control before it builds back up again.
Being More Careful With Future Notification Prompts
Since Method 3 above (the quieter messaging option) helps reduce interruption without eliminating notifications as a feature entirely, it’s worth pairing that with simply being a bit more deliberate going forward about which sites you actually allow.
A good general rule: only click “Allow” for sites where you’d genuinely want real-time alerts, like a specific work tool, a package tracking service, or a messaging platform you use daily. For most news sites, blogs, and online stores, clicking “Block” or simply dismissing the prompt without choosing either option (which usually defaults to not granting permission) avoids adding to the clutter in the first place, saving you from having to go back and clean things up later.
Managing Chrome Notifications on Your Phone Too
If you’re specifically dealing with this on your Windows PC but also notice similar notification clutter on your phone, it’s worth knowing the settings work a bit differently there, since mobile Chrome handles permissions through your phone’s own system settings rather than Chrome’s internal menu alone.
On Android: Open Settings > Apps > Chrome > Notifications, where you can turn off notifications for Chrome entirely, or tap into specific categories if your phone breaks them down further. You can also manage individual site permissions the same way as on desktop, through Chrome’s own Settings > Notifications menu within the app itself.
On iPhone: Since Apple handles notification permissions at the system level, go to Settings > Notifications > Chrome to adjust how Chrome notifications appear, or turn them off completely. iOS Chrome has more limited support for website push notifications compared to Android or desktop, so this is generally a smaller issue for iPhone users to begin with.
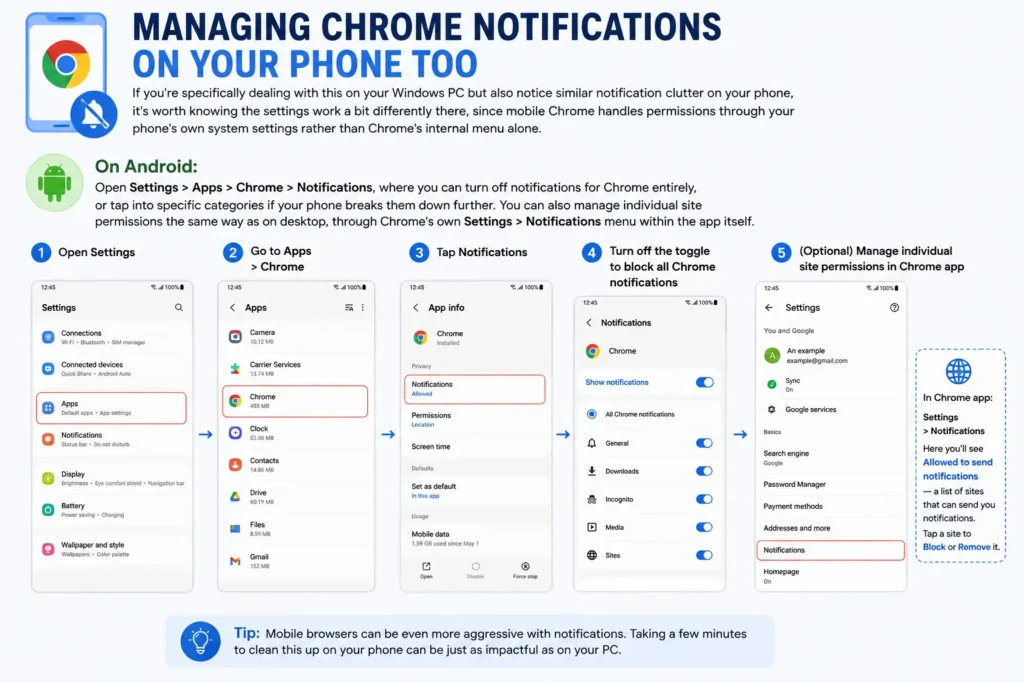
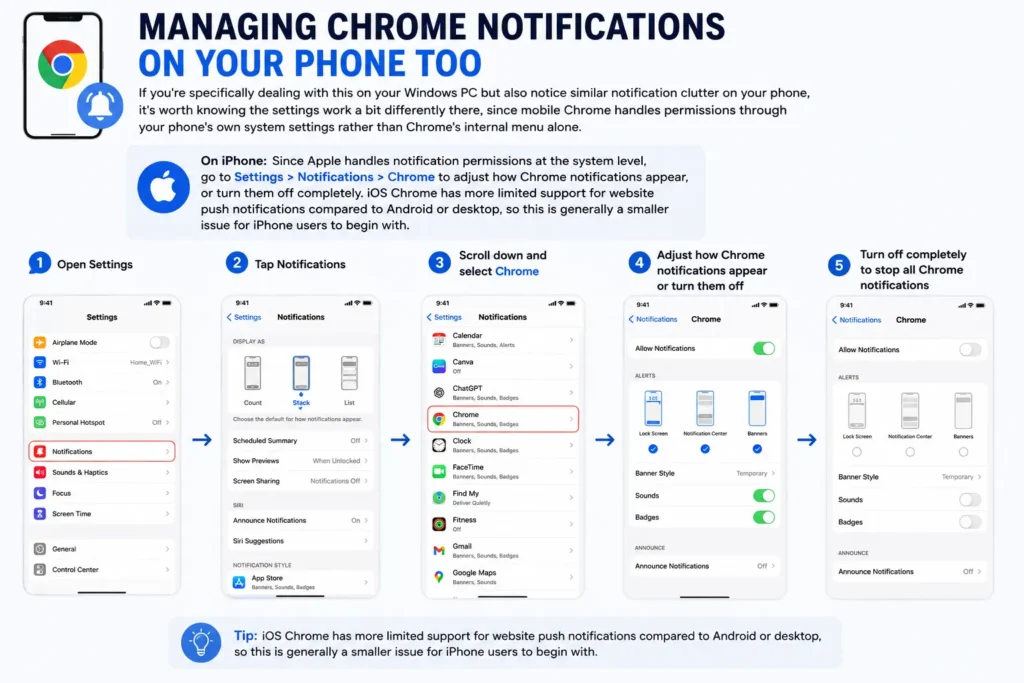
Keeping both your desktop and mobile settings in mind is worth doing if you use Chrome across multiple devices, since a site blocked on your PC won’t automatically be blocked on your phone as well, they’re managed independently depending on which device and profile you’re using.
Using Windows Focus Assist for Temporary, Broader Control
If your goal is less about permanently blocking specific sites and more about just getting a quiet, distraction-free stretch of time, like during work hours or while watching something, Windows has a built in feature that handles this more broadly than adjusting Chrome settings each time.
- Open Settings > System > Focus (called Focus Assist on some older Windows versions)
- Turn on Focus or set up a schedule for when it should activate automatically
- Choose how strict you want it, options typically range from muting only notifications while keeping alarms and calls through, to silencing nearly everything except what you’ve specifically marked as a priority
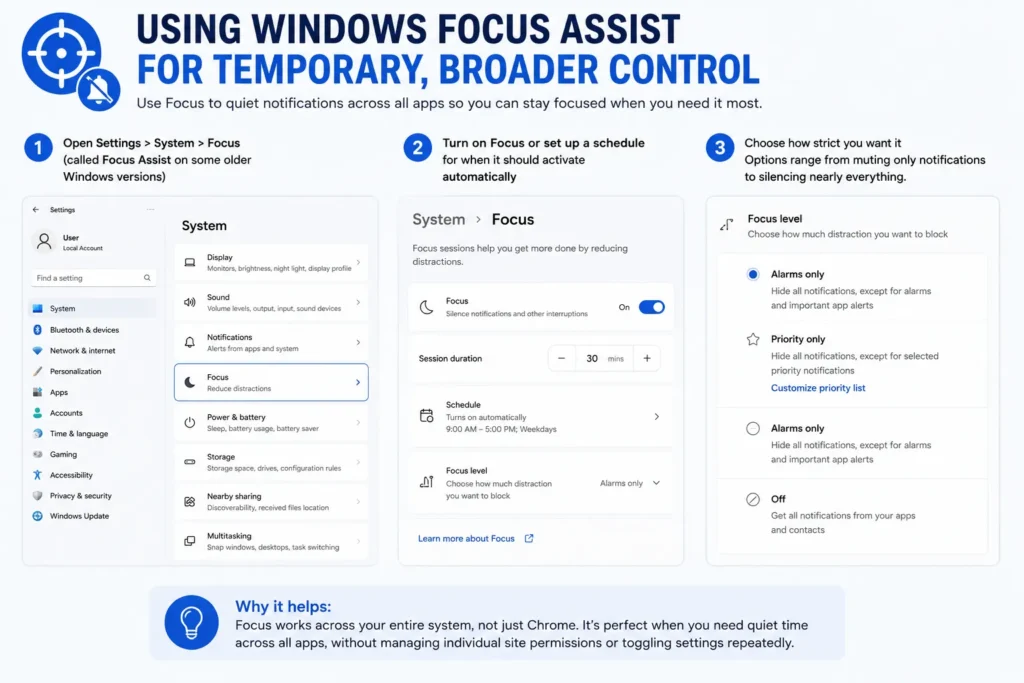
This is a useful complement to the Chrome specific settings covered above, since it silences notifications from every app at once, not just Chrome, without requiring you to individually manage site permissions or toggle Chrome-specific settings on and off depending on whether you want quiet time right now. It’s particularly handy if the issue isn’t really about disliking notifications altogether, but simply wanting them paused during certain hours rather than gone permanently.
What to Do If Notifications Keep Appearing Even After Blocking Them
Occasionally, after going through the steps above, people find a notification still slips through, which is usually explained by one of a couple of things. If you have multiple Chrome profiles set up (visible by clicking your profile icon in the top-right corner of Chrome), notification settings are managed separately for each profile, so a site blocked under one profile can still send notifications if you’re browsing under a different one. It’s also worth confirming you’re not confusing a genuine Windows system notification, like one from Windows Security or an installed app, with a Chrome-specific one, since these look similar in the Windows notification tray but are controlled through entirely separate settings.
If a specific notification keeps reappearing despite being blocked, restarting Chrome fully (closing all windows completely, not just minimizing) sometimes resolves a setting that hadn’t fully applied yet, particularly right after making a change.