
By default, Windows 11 dumps every screenshot you take into the Pictures > Screenshots folder. That’s fine for a while, but if you take screenshots often, that folder fills up fast, and it’s not always the most convenient place to find them. Maybe you want them going straight to OneDrive, a folder you sync with a client, or just somewhere easier to reach on your desktop.
The good news is that changing this is pretty straightforward once you know where to look. The method depends on how you’re taking your screenshots, since Windows 11 actually has a few different screenshot tools, and each one handles the save location a little differently.
Method 1: Change the Location for the Print Screen Key
If you’re using the classic Print Screen key to save full screen screenshots automatically, here’s how to redirect where they land:
- Open File Explorer and go to your current Screenshots folder (usually This PC > Pictures > Screenshots)
- Right click the Screenshots folder and select Properties
- Go to the Location tab
- Click Move… and choose the new folder where you want screenshots saved
- Click Select Folder, then Apply
- Windows will ask if you want to move existing files to the new location click Yes if you want your old screenshots to come along
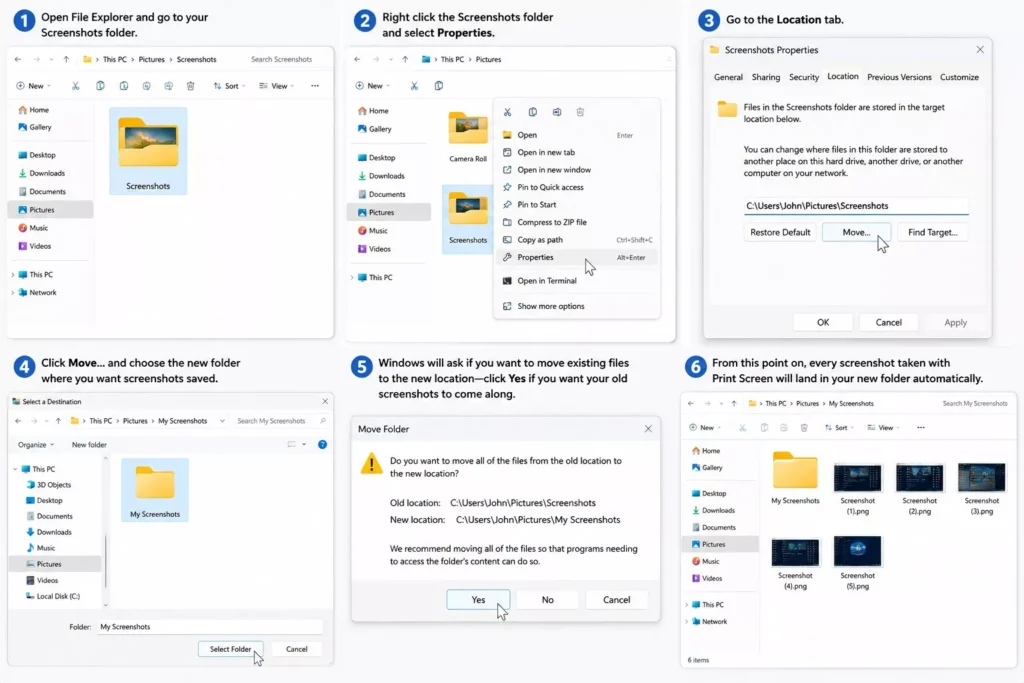
From this point on, every screenshot taken with Print Screen will land in your new folder automatically.
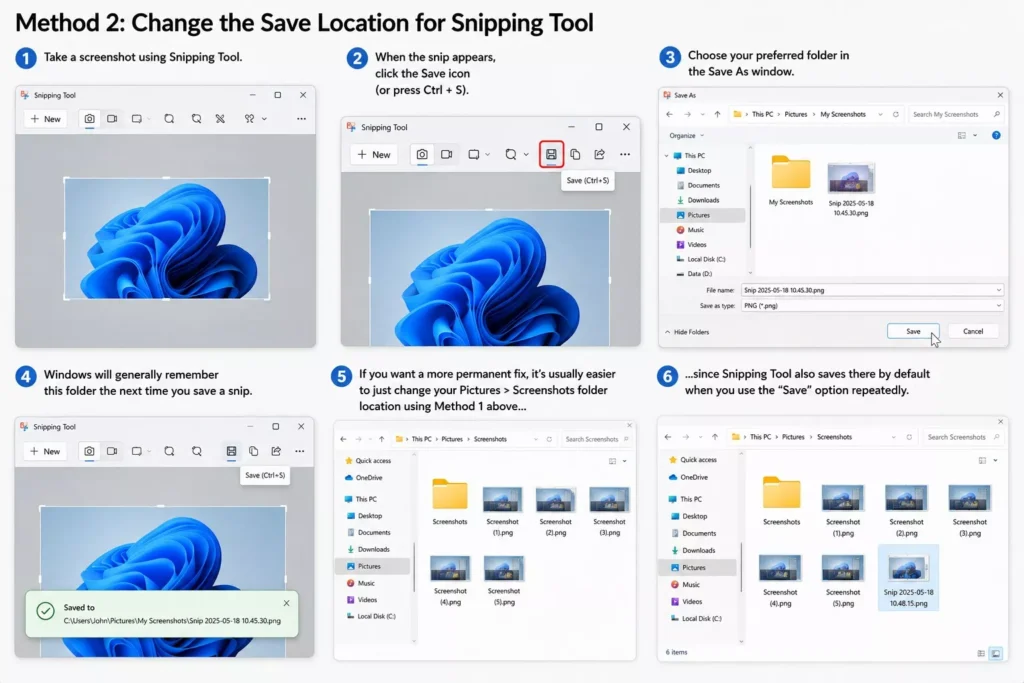
Method 2: Change the Save Location for Snipping Tool
The Snipping Tool (the one you open with Windows key + Shift + S, or by launching it directly) doesn’t actually have a dedicated “change save folder” setting the way you might expect. Instead, it depends on how you save your snip:
- Take a screenshot using Snipping Tool
- When the snip appears, click the Save icon (or press Ctrl + S)
- Choose your preferred folder in the Save As window
- Windows will generally remember this folder the next time you save a snip
If you want a more permanent fix, it’s usually easier to just change your Pictures > Screenshots folder location using Method 1 above, since Snipping Tool also saves there by default when you use the “Save” option repeatedly.
Method 3: Redirect Screenshots to OneDrive
If you’d rather have your screenshots automatically backed up to the cloud, you can point the Screenshots folder to your OneDrive instead:
- Follow the same steps as Method 1, but when choosing the new folder location, navigate to your OneDrive folder (for example, OneDrive > Pictures > Screenshots)
- Click Select Folder, then Apply
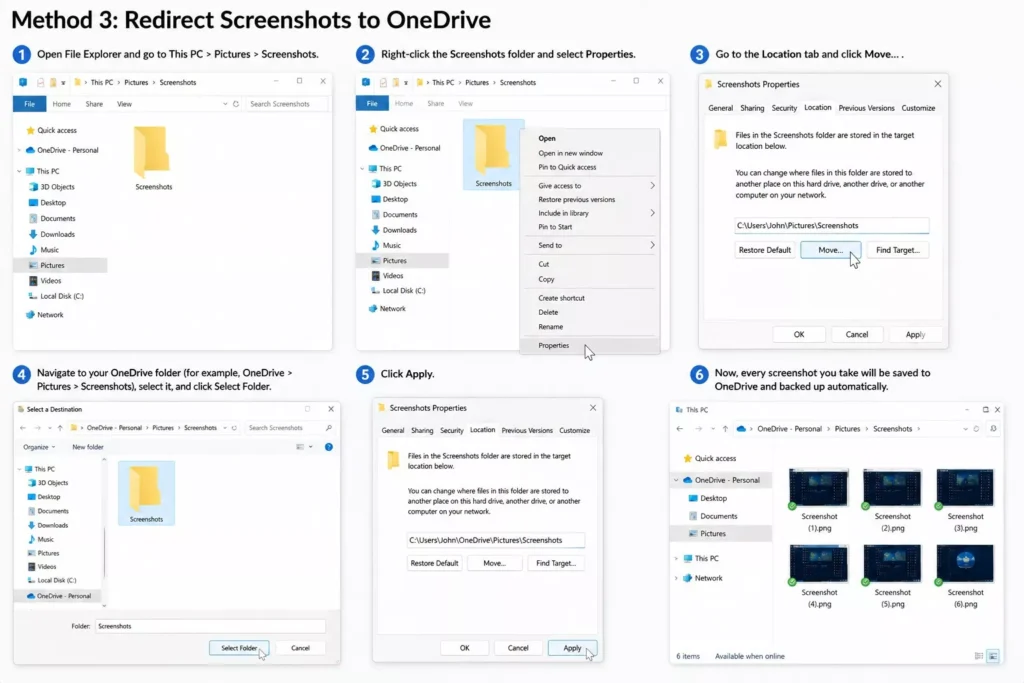
This way, every screenshot you take gets backed up automatically and syncs across your other devices signed into the same OneDrive account.
Method 4: Using the Registry Editor (For Advanced Users)
If for some reason the folder Properties method isn’t working, or you want to script this change across multiple PCs, you can edit the registry directly. This is a more advanced option, so proceed carefully:
- Press Windows key + R, type
regedit, and hit Enter - Navigate to:
HKEY_CURRENT_USER\Software\Microsoft\Windows\CurrentVersion\Explorer\User Shell Folders- Find the entry named {B7BEDE81-DF94-4682-A7D8-57A52620B86F} — this controls the Screenshots folder path
- Double-click it and change the value to your new folder path
- Restart your PC for the change to take effect
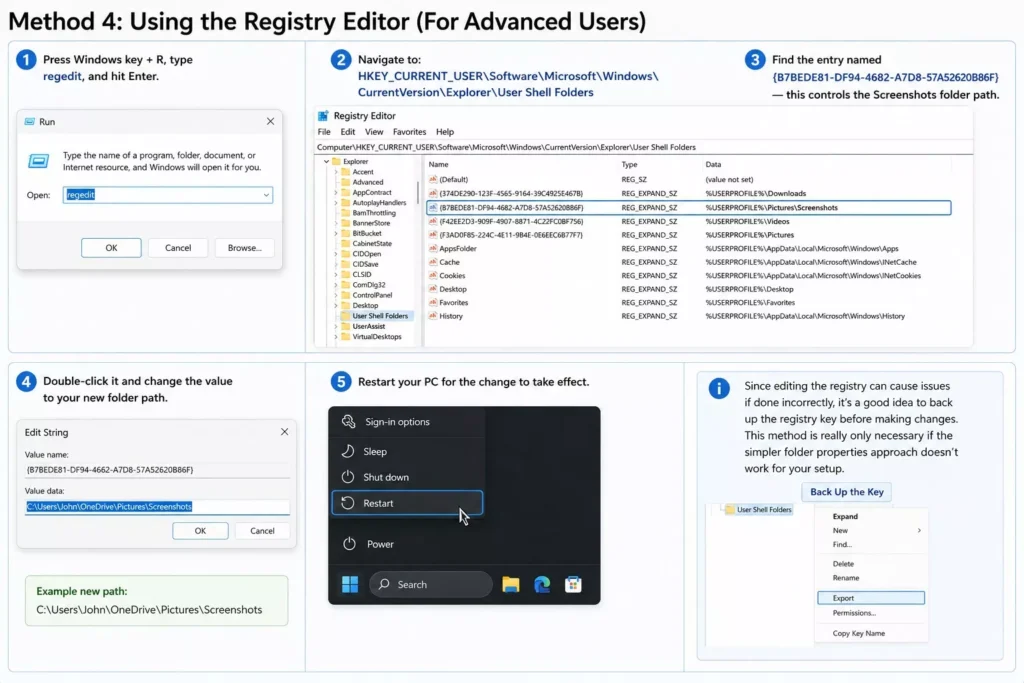
Since editing the registry can cause issues if done incorrectly, it’s a good idea to back up the registry key before making changes, and this method is really only necessary if the simpler folder properties approach doesn’t work for your setup.
Why Bother Changing the Default Screenshot Location?
It might seem like a small thing, but once you start taking screenshots regularly, the default location starts working against you. If you’re someone who takes screenshots for work documentation, bug reports, client feedback, tutorials having them scattered in the default Pictures folder means you’re constantly digging through irrelevant photos to find the one screenshot you actually need. Moving them to a dedicated project folder, a shared drive, or a cloud synced location keeps things organized from the start instead of forcing you to clean up a mess later.
There’s also the storage angle. Screenshots pile up faster than people expect, especially if you’re on a laptop with limited SSD space. Redirecting them to an external drive or a cloud folder that auto-syncs and then clears local copies can free up a surprising amount of space over time.
Troubleshooting: Screenshots Still Saving to the Old Folder?
Every once in a while, changing the folder location doesn’t fully “stick,” and screenshots keep showing up in the old Pictures > Screenshots folder no matter what you do. If that happens to you, here are a few things worth checking:
- Restart your PC. This sounds too simple, but Windows sometimes needs a restart before it fully applies the new folder path, especially if you changed it through the registry.
- Check if OneDrive is managing your Pictures folder. If OneDrive backup for the Pictures folder is turned on, it can quietly override your custom location. Go to OneDrive settings > Backup and check whether “Pictures” is being backed up automatically, and adjust it if needed.
- Make sure you clicked Apply, not just OK. In the folder Properties window, clicking Apply is what actually saves the new path — closing the window without hitting Apply first won’t save your change.
- Try a different screenshot method. Since Print Screen, Snipping Tool, and third-party apps can each behave slightly differently, test with more than one method to confirm whether the issue is with Windows itself or a specific app.
If none of that works, going back through the folder Properties steps and re selecting the new location usually resolves it.
A Quick Tip
If you use multiple screenshot tools (Print Screen, Snipping Tool, and maybe a third party app), it’s worth keeping them all pointed to the same folder. Otherwise you’ll end up hunting through two or three different places trying to find a screenshot you took five minutes ago.