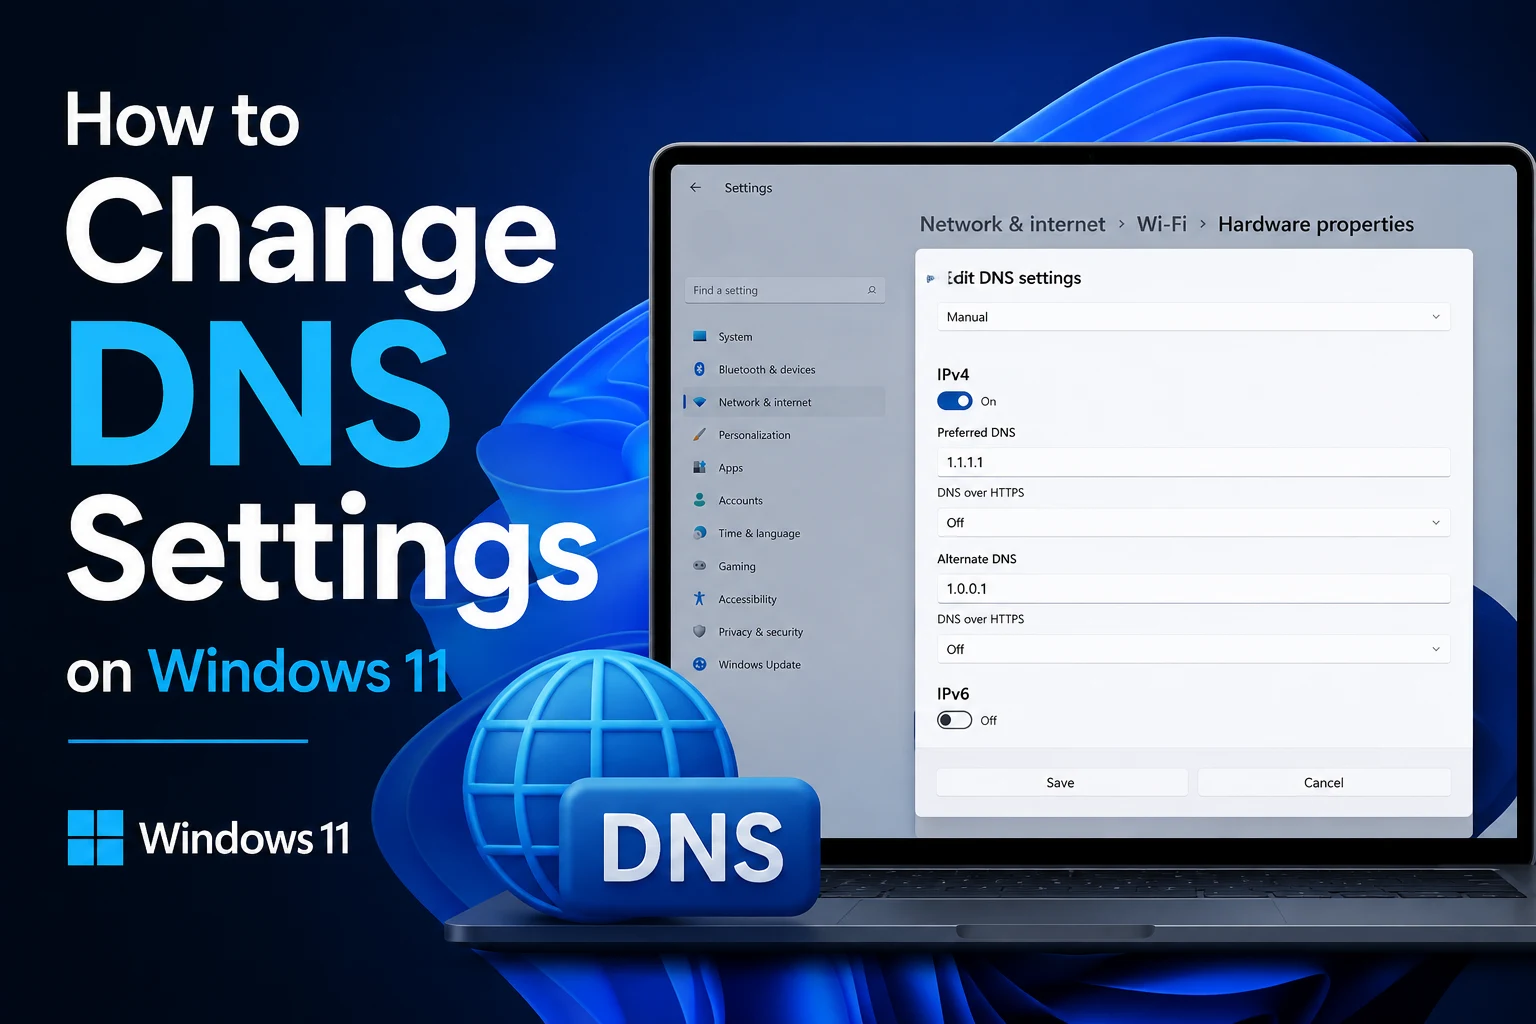

If websites take longer to load than they should, certain sites won’t load at all, or you’ve heard that switching your DNS can speed things up and add a bit of privacy, changing your DNS settings on Windows 11 is a lot simpler than it sounds. You don’t need to be technical to do this, it’s a few clicks in Settings, and the whole thing takes about a minute once you know where to go.
Here’s a full walkthrough, including what DNS actually does, how to change it, and which DNS providers are worth considering.
What DNS Actually Does (Quick Explanation)
Every time you type a website address like google.com into your browser, your computer needs to translate that into an IP address, a string of numbers computers actually use to find and connect to that website. DNS (Domain Name System) is essentially the phonebook that handles this translation behind the scenes.
By default, your DNS requests go through whatever server your internet provider (ISP) assigns automatically, which isn’t always the fastest or most private option. Switching to a different DNS provider, like Google, Cloudflare, or Quad9, can sometimes speed up how quickly websites resolve, and depending on the provider, may offer better privacy or built-in protection against malicious sites.
Method 1: Change DNS Through Settings ( Easiest Way )
This is the most straightforward method and works well for most people.
- Open Settings ( press Windows key + I )
- Go to Network & internet
- Click on your active connection, either Wi-Fi or Ethernet, depending on how you’re connected
- Click Hardware properties
- Next to DNS server assignment, click Edit
- Change the dropdown from Automatic ( DHCP ) to Manual
- Toggle IPv4 on
- Enter your preferred DNS server in the Preferred DNS field, and a backup in the Alternate DNS field
- Click Save
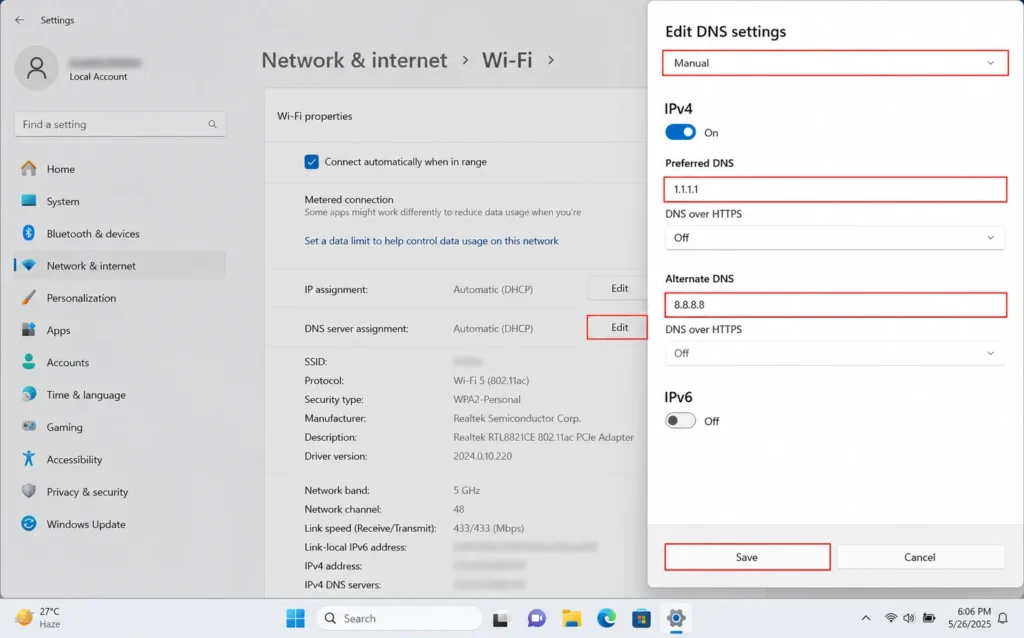
Once saved, your PC will start using the new DNS servers for all internet requests going forward, no restart required in most cases.
Popular DNS Providers Worth Considering
If you’re not sure which DNS servers to actually enter, here are a few well known, free options people commonly switch to:
Google Public DNS
- Preferred: 8.8.8.8
- Alternate: 8.8.4.4
Known for being fast and reliable, and it’s one of the most widely used public DNS services available.
Cloudflare DNS
- Preferred: 1.1.1.1
- Alternate: 1.0.0.1
Cloudflare markets this specifically around speed and privacy, claiming not to log your browsing data for advertising purposes, and it’s generally considered one of the fastest public DNS options available.
Quad9
- Preferred: 9.9.9.9
- Alternate: 149.112.112.112
Quad9 focuses on security, automatically blocking known malicious and phishing domains at the DNS level before your browser even attempts to load them.
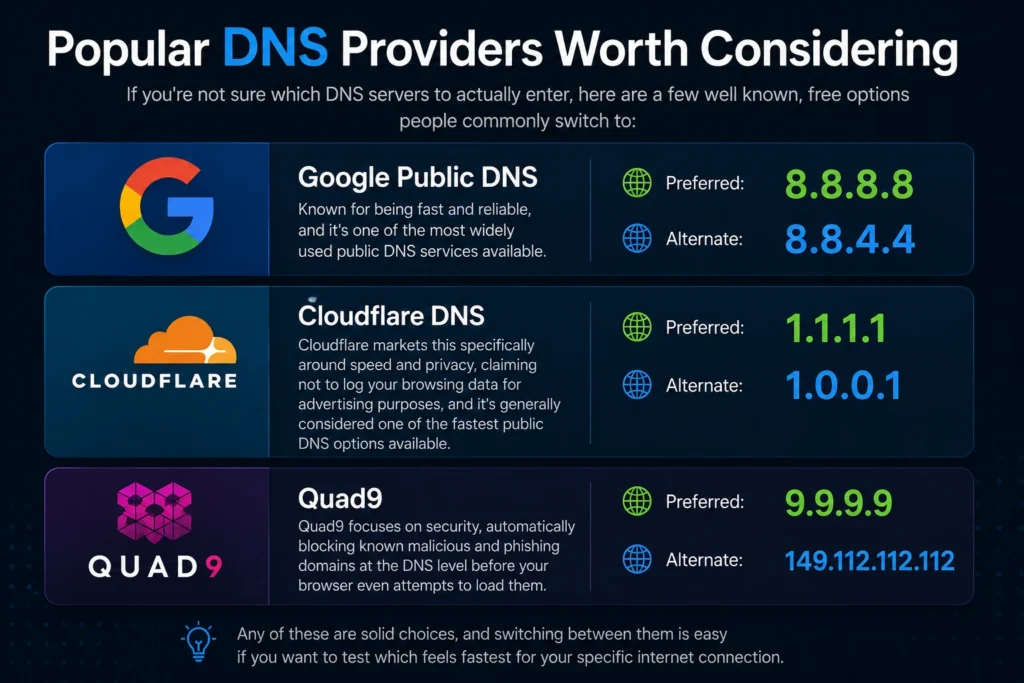
Any of these are solid choices, and switching between them is easy if you want to test which feels fastest for your specific internet connection.
Method 2: Change DNS Using Control Panel ( Older Method, Still Works )
If you’re more comfortable with the classic Windows interface, Control Panel offers the same setting through a slightly different path.
- Open Control Panel (search for it in the Start menu)
- Go to Network and Internet > Network and Sharing Center
- Click Change adapter settings in the left sidebar
- Right-click your active network connection and select Properties
- Select Internet Protocol Version 4 ( TCP/IPv4 ), then click Properties
- Select Use the following DNS server addresses
- Enter your preferred and alternate DNS addresses
- Click OK, then Close
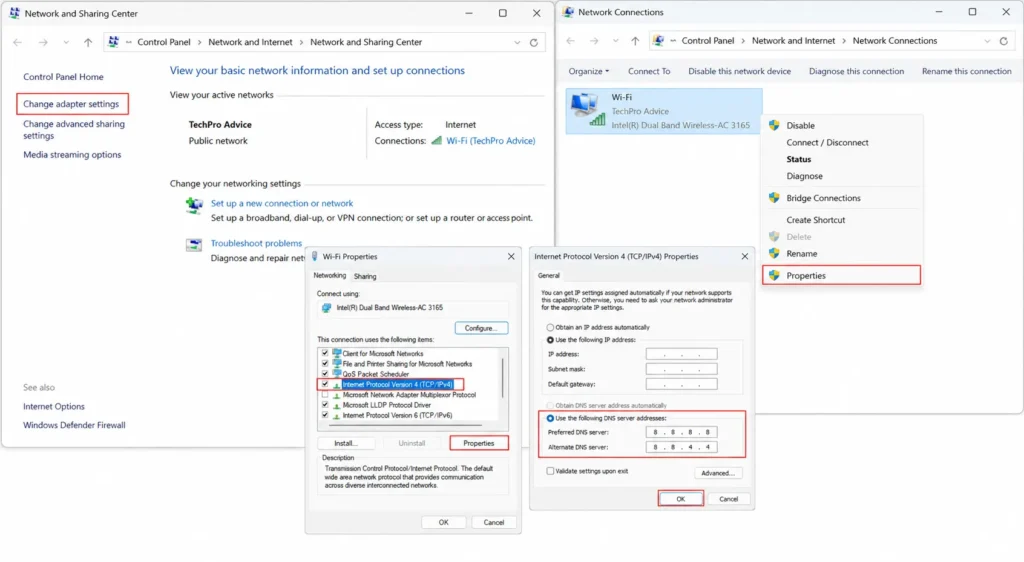
This achieves the exact same result as Method 1, so use whichever interface feels more familiar to you.
Method 3: Change DNS Using PowerShell (Fastest for Advanced Users)
If you’d rather skip the menus entirely, PowerShell lets you change DNS settings with a single command.
- Right click the Start button and select Windows Terminal ( Admin ) or PowerShell (Admin)
- First, find your network adapter’s name by running:
Get-NetAdapter
- Once you know your adapter name ( commonly “Wi-Fi” or “Ethernet” ), run the following, replacing “Wi-Fi” with your actual adapter name and the addresses with your preferred DNS provider:
Set-DnsClientServerAddress -InterfaceAlias "Wi-Fi" -ServerAddresses ("1.1.1.1","1.0.0.1")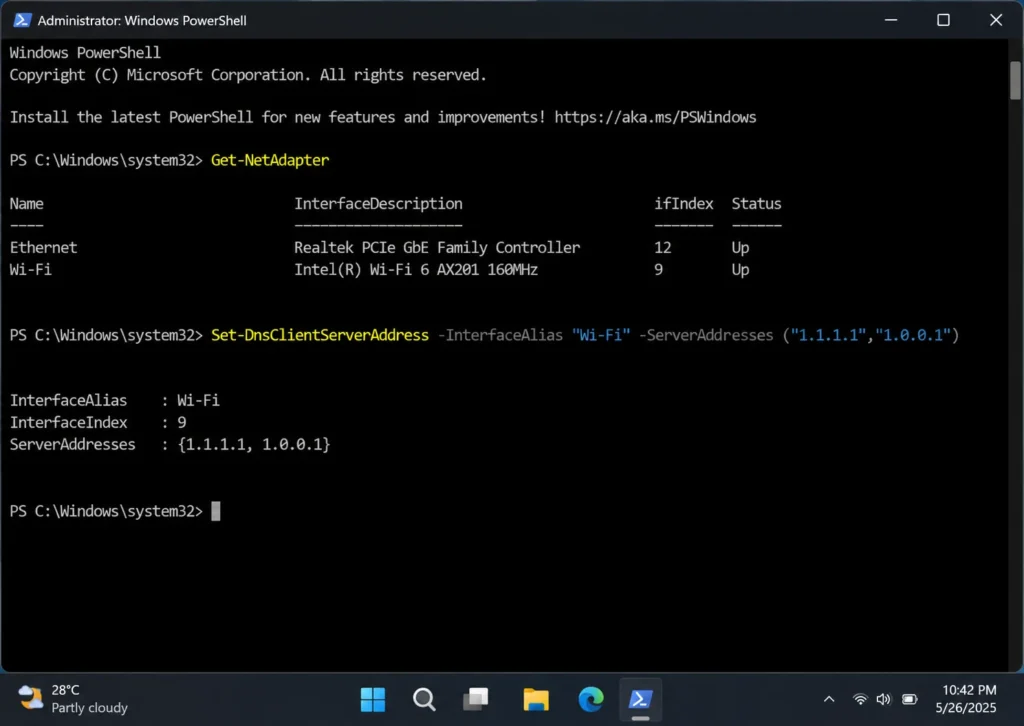
This is a quick option if you’re comfortable with command-line tools, or if you want to script DNS changes across multiple machines at once.
How to Confirm Your New DNS Is Actually Working
After making the change, it’s worth double checking that it actually took effect rather than just assuming it did.
- Open Command Prompt
- Run the following command:
nslookup google.com
- Check the “Server” address shown in the results, it should match the DNS server you just entered ( like 1.1.1.1 for Cloudflare )
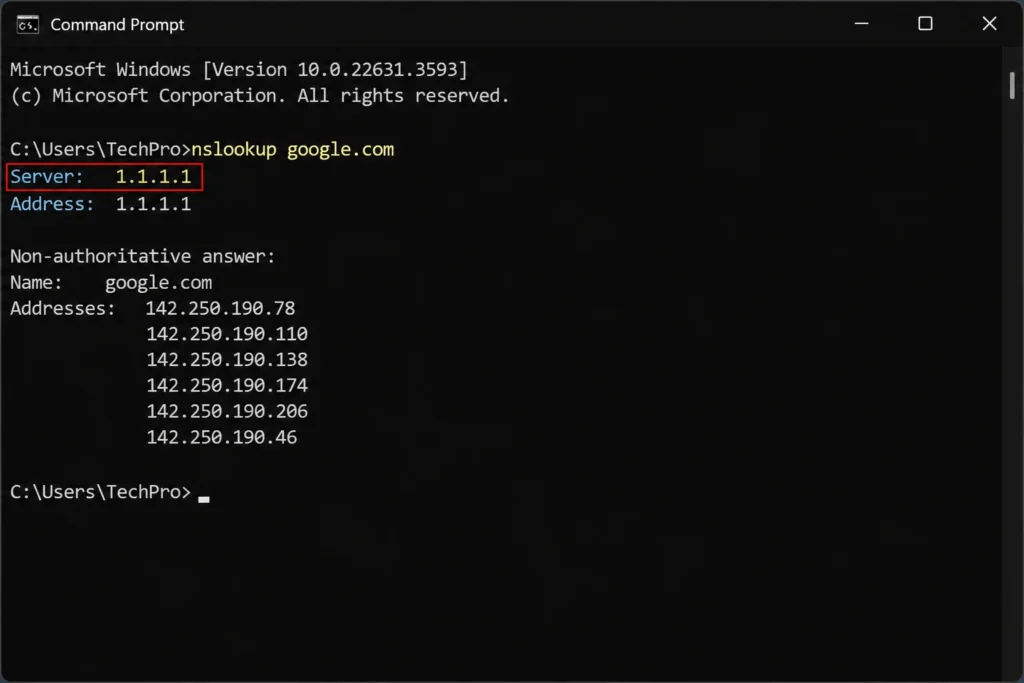
If it shows your new DNS server, the change was applied successfully. If it still shows your old ISP’s DNS, double check that you saved the settings correctly and applied them to the right network connection, especially if you have both Wi-Fi and Ethernet available and accidentally changed the one you’re not currently using.
How to Revert Back to Automatic ( Default ) DNS
If you want to switch back to your ISP’s default DNS at any point, whether to troubleshoot an issue or simply because you’d rather not manage it manually, reverting is just as easy as changing it in the first place.
- Go back to Settings > Network & internet
- Click your active connection, then Hardware properties
- Click Edit next to DNS server assignment
- Change it back to Automatic ( DHCP )
- Click Save
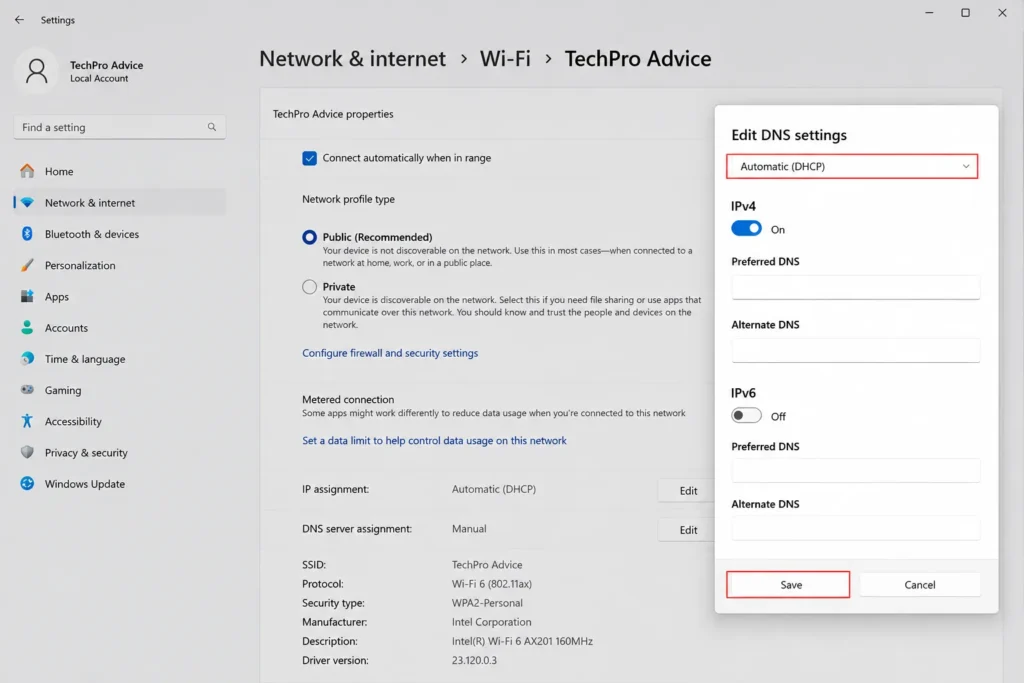
This restores the default behavior, letting your internet provider assign DNS servers automatically the way it did before you made any changes.
When Changing DNS Actually Helps (And When It Doesn’t)
It’s worth setting realistic expectations here, since DNS changes help with some things and not others. Switching DNS providers can genuinely improve how quickly websites start loading, since it affects how fast your device translates a web address into a usable connection, and it can add privacy benefits or basic malicious site blocking depending on the provider you choose.
What it won’t do is fix slow download speeds, buffering video, or general internet speed issues, since those are related to your actual bandwidth and connection, not DNS. If your internet feels broadly slow rather than specifically slow to start loading websites, DNS probably isn’t the underlying cause, and it’s worth looking at your router, internet plan, or Wi-Fi signal instead.
How to Change DNS on a Specific Device Instead of Your Whole Network
If you only want faster or more private DNS on one particular device rather than every computer and phone connected to your Wi-Fi, changing it in Windows Settings the way covered above only affects that one PC, which is usually exactly what most people want. But it’s worth knowing there’s also a network wide option, changing DNS directly on your router instead, which applies the new settings to every device that connects to your Wi-Fi automatically, including phones, smart TVs, and game consoles, without needing to configure each one individually.
Router level DNS changes are done through your router’s admin settings page (usually accessed by typing an address like 192.168.1.1 into a browser ), and the exact steps vary by router brand, so checking your specific router’s manual or support page is the best way to do this if you’d rather apply DNS changes across your whole home network at once.
Should You Enable DNS over HTTPS (DoH)?
Windows 11 also includes a more advanced privacy feature worth knowing about called DNS over HTTPS, which encrypts your DNS requests so they can’t be easily seen or intercepted by anyone monitoring your network traffic, including your internet provider.
- Go to Settings > Network & internet, click your active connection, then Hardware properties
- Click Edit next to DNS server assignment (with Manual and your preferred DNS already entered)
- Look for the DNS over HTTPS dropdown and set it to On ( some DNS providers like Cloudflare and Google support this directly )
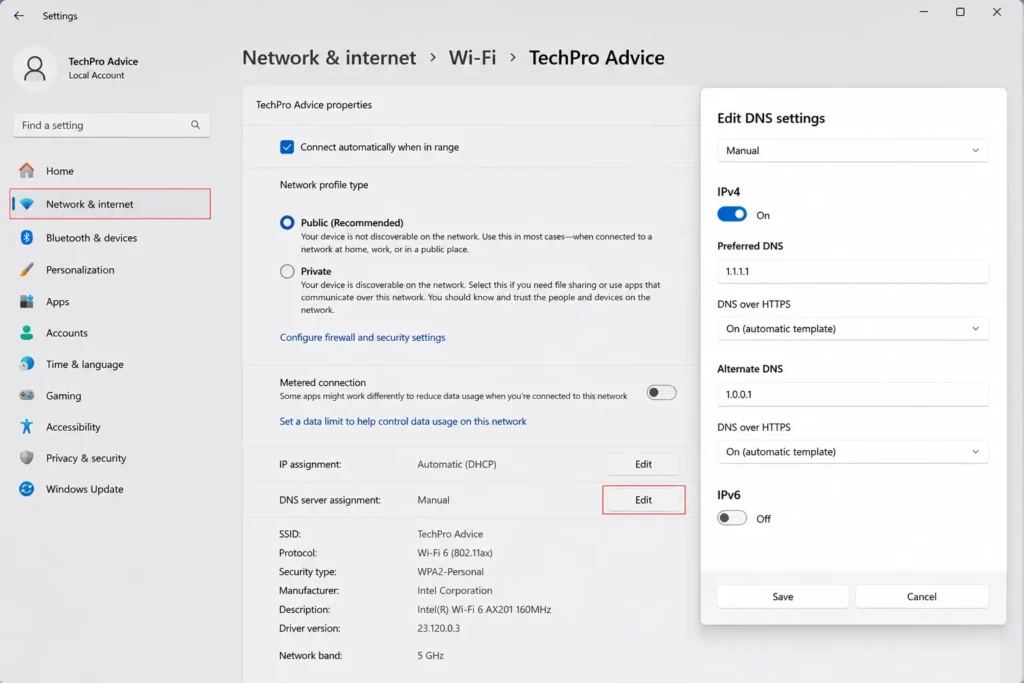
This isn’t necessary for everyone, but if privacy is a priority for you specifically, and you’re already switching to a DNS provider that supports it, like Cloudflare or Google, turning this on adds a meaningful extra layer of protection with very little effort involved.
Troubleshooting: Websites Won’t Load After Changing DNS
Occasionally, switching DNS servers causes certain websites to load slowly or not at all, which understandably makes people assume they broke something, though this is usually an easy fix.
- Flush your DNS cache. Open Command Prompt and run
ipconfig /flushdns, this clears out old, cached DNS information that might still be pointing to your previous DNS server - Double-check you entered the addresses correctly. A single mistyped number in the DNS address field is a surprisingly common cause of connectivity issues right after making this change
- Try the alternate DNS address alone first. If the preferred server seems to be causing an issue, temporarily removing it and testing with just the alternate address can help isolate whether one specific server is the problem
- Restart your router if the issue persists across multiple devices. This is rarely necessary for a single device DNS change, but worth trying if something seems oddly inconsistent afterward
If none of this resolves it, reverting back to Automatic ( DHCP ), as covered earlier in this guide, immediately restores your previous working setup while you figure out what went wrong.
One Last Thing
Changing your DNS settings on Windows 11 is a quick, low risk change that can genuinely improve browsing speed and, depending on the provider you choose, add a layer of privacy or basic security. Whether you go through Settings, Control Panel, or PowerShell, the process takes just a couple of minutes, and switching back to automatic later is just as easy if you ever want to undo it.