
Unlike a traditional hard drive that tends to give you warning signs before it fails, clicking noises, slowdowns, that unsettling grinding sound, SSDs have a nasty habit of working perfectly fine right up until the moment they don’t. There’s no mechanical wear you can hear coming. This is exactly why checking SSD health proactively actually matters, rather than just waiting for something to feel wrong and hoping you catch it in time.
The reassuring part is that SSDs track their own wear internally through something called SMART data, and Windows, along with a few excellent free tools, can read that data and tell you almost exactly how your drive is holding up.
SMART Data: The Thing Your SSD Already Knows About Itself
Every modern SSD constantly monitors its own condition through a built in system called SMART, short for Self Monitoring, Analysis, and Reporting Technology. Think of it as the drive keeping a running diary of things like how many times data has been written to it, how many bad sectors have shown up, its internal temperature, and a general health percentage the manufacturer calculates based on all of this.
You don’t need to be technical to make use of this, you just need something capable of reading it, since SMART data isn’t something Windows surfaces prominently in its normal interface.
Checking Basic Drive Status Through Windows Itself
Windows does include a genuinely useful, if somewhat buried, built in tool worth checking first before reaching for anything else.
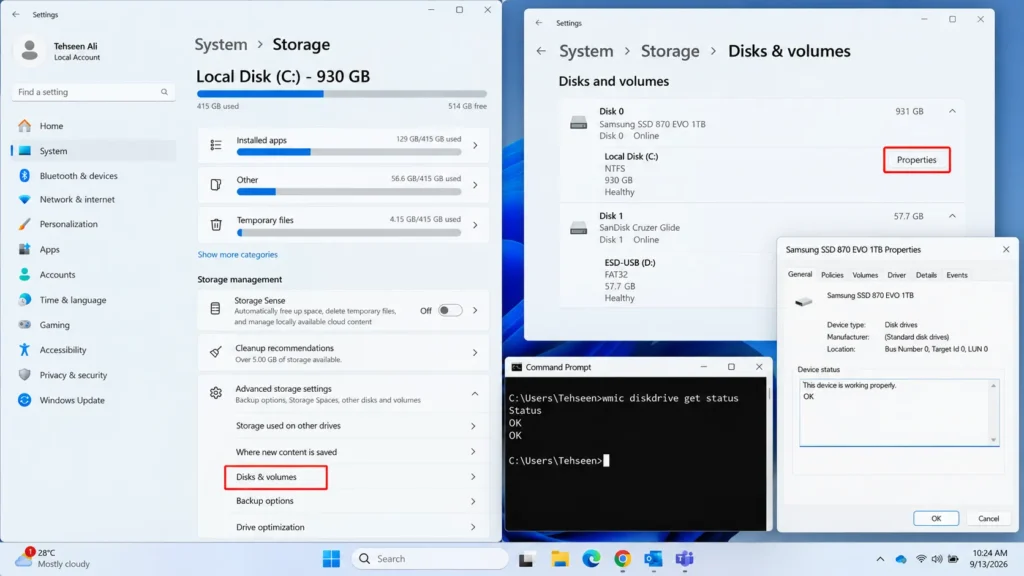
Open Settings, go to System, then Storage, and click Disks & volumes. Click on your SSD, and you’ll see a Properties button that reveals basic information. It’s not deeply detailed, but it does show whether Windows considers the drive to be in good working order, and it’s a quick starting point that requires zero downloads.
For something a bit more revealing, Command Prompt has a built in command that checks drive status directly:
wmic diskdrive get status
This returns a simple “OK” for each connected drive if everything checks out, or flags a problem if Windows detects something concerning at the hardware level. It’s fast, it’s already on your PC, and it’s worth running periodically even if you don’t plan to dig deeper.
Where Free Third Party Tools Actually Earn Their Keep
Windows’ built-in options tell you whether something is fine, but they’re not great at telling you exactly how fine, or how close you might be to a problem. This is where dedicated SSD monitoring tools genuinely add value, since they read the full SMART data set and translate it into numbers that actually mean something.
CrystalDiskInfo is the tool most people end up recommending, and for good reason. Download it, run it, and it immediately shows your drive’s health status as a clear percentage, along with specific SMART attributes like power on hours, temperature, and total bytes written. Healthy drives typically show up in blue, drives worth keeping an eye on show in yellow, and anything in red deserves your attention soon.
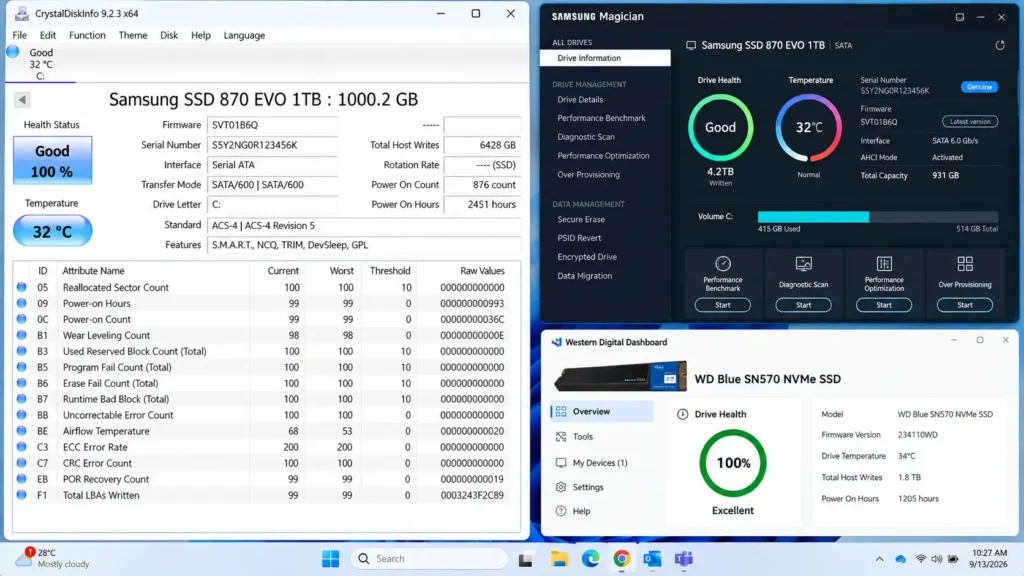
If your SSD is from a major manufacturer like Samsung, Crucial, or Western Digital, their own official tools (Samsung Magician, Crucial Storage Executive, Western Digital Dashboard) often provide even more tailored detail, sometimes including manufacturer-specific health estimates and firmware update options that generic tools can’t offer.
Understanding What “Drive Health” Percentage Actually Represents
This number gets thrown around a lot, but it’s worth clarifying what it genuinely measures, since it’s easy to misread. SSD health percentage is primarily based on how much of the drive’s rated write endurance has been used up. Every SSD is built to reliably handle a certain total amount of data written to it over its lifetime, sometimes expressed as TBW, or terabytes written, and the health percentage essentially reflects how much of that budget remains.
A drive sitting at 95% health after a year of normal use is completely unremarkable, and honestly expected. Drives dropping noticeably faster than that, especially without unusually heavy daily use, are worth paying closer attention to, since it might point toward abnormal write activity happening somewhere in the background that’s worth investigating.
Total Bytes Written and Why It Matters More Than People Assume
Buried within the SMART data most tools display is a figure called Total Bytes Written, sometimes shown as TBW or Host Writes. This tracks the cumulative amount of data that’s actually been written to your SSD since day one, and comparing it against your specific SSD model’s rated endurance (found on the manufacturer’s spec sheet or product page) gives you a genuinely accurate sense of where you stand relative to the drive’s expected lifespan.
For context, most consumer SSDs are rated somewhere between 150TB and 600TB of total writes before reaching end of life, and the average person, doing normal browsing, document work, and moderate gaming, writes nowhere near that amount even after several years. Heavy users, particularly anyone doing constant video editing, large file transfers, or running a machine that’s writing logs or cache data nonstop, burn through that budget considerably faster, which is exactly why checking this number occasionally is worth the two minutes it takes.
Temperature: A Quieter but Real Factor in SSD Longevity
Most people focus entirely on write endurance and completely overlook temperature, but SSDs, particularly NVMe drives, do run into thermal throttling and accelerated wear if they consistently run hot. Anything comfortably under 70°C during normal use is generally fine, but drives that regularly climb into the 70s or 80s, especially laptops with cramped internal cooling, are worth investigating a bit further.
CrystalDiskInfo and most manufacturer tools display current and peak temperature readings directly alongside the health percentage, so it’s easy to glance at both simultaneously rather than treating them as separate concerns.
Reading the Warning Signs Before They Become a Real Problem
A few specific indicators, beyond just the overall health percentage, are worth watching for since they tend to show up before an actual failure:
A rising count of reallocated sectors means the drive has started marking small sections of its storage as unusable and quietly routing around them, a normal process in small amounts, but a rapidly increasing count is a genuine early warning sign. Uncorrectable error counts climbing over time suggest the drive is struggling in ways it can no longer silently compensate for on its own. And a health percentage dropping unusually fast between checks, rather than gradually over months, often points to either abnormal write activity or a drive nearing genuine failure rather than simple, expected aging.
None of these individually mean immediate disaster, but seeing more than one trending in the wrong direction at the same time is a solid signal it’s time to back up important data sooner rather than later, even if the drive still technically boots and works normally in the moment.
NVMe Versus SATA SSDs: Does the Health Check Process Differ?
Both drive types get monitored through SMART data, but NVMe drives (the faster ones connected directly via the M.2 slot on your motherboard) actually expose a richer set of health attributes than older SATA SSDs, largely because the NVMe standard was built more recently with more detailed self-monitoring baked in from the start. This is why NVMe drives in CrystalDiskInfo often show additional fields, like “Available Spare” and “Percentage Used,” that SATA drives don’t report in quite the same way.
Practically speaking, this doesn’t change how you go about checking things, the same tools work fine for both. It just means NVMe drives tend to give you a slightly more granular picture, which is genuinely useful if you’re trying to catch a developing issue earlier rather than relying on a single overall health number alone.
What a Sudden Drop in Health Percentage Usually Means
If you check your drive’s health one month and it’s sitting comfortably at 98%, then check again a few weeks later and it’s suddenly at 80%, that’s a meaningfully different situation than a slow, gradual decline over a year. A sharp, sudden drop usually points to one of a few specific causes rather than normal aging: an application or background process writing far more data than it should (sometimes a symptom of malware, a stuck logging process, or a misbehaving app), a firmware reporting glitch that occasionally corrects itself after an update, or in less common cases, a genuine hardware issue accelerating faster than typical wear patterns would suggest.
Checking Task Manager’s disk activity tab, or Resource Monitor for a more detailed breakdown, can help identify whether something is actively hammering the drive with unusual write activity right now, which is often the more immediate and useful thing to investigate before assuming the worst about the drive itself.
Backing Up Based on Health Data, Not Just Waiting for Failure
Since SSDs can go from “seems fine” to “won’t boot” with very little warning, it’s worth using health monitoring as an actual trigger for backup decisions rather than treating backups as a separate, unrelated task you get around to eventually.
A reasonable approach: once a drive’s health percentage drops into the 70s, or you notice reallocated sectors or uncorrectable errors climbing steadily across a few consecutive checks, treat that as your cue to make sure anything important is backed up somewhere else, not necessarily because failure is imminent, but because you’ve lost the luxury of assuming you’ll get advance warning. Waiting until a drive is visibly struggling, freezing, throwing read errors, taking unusually long to boot, means you’re often backing up under pressure with a drive that’s already failing, which is a considerably worse position to be troubleshooting from.
Manufacturer Tools Versus Universal Tools: Which Should You Trust More?
This comes up often enough to address directly: if Samsung Magician says your Samsung drive is at 96% health but CrystalDiskInfo shows a slightly different number, that’s not a bug or a sign something’s wrong, it’s just a difference in how each tool weighs and calculates the underlying SMART data into a single percentage.
Manufacturer tools generally have an advantage in accuracy for their own specific drives, since they’re built with intimate knowledge of exactly how that model’s firmware reports its data. Universal tools like CrystalDiskInfo are more valuable for consistency across multiple drives from different brands, letting you compare an SSD from one manufacturer against another using the same interface and general methodology. If you own a drive from a major manufacturer, it’s genuinely worth having both installed, the manufacturer’s tool for the most model specific accuracy, and a universal tool like CrystalDiskInfo if you ever add a drive from a different brand down the line.
Making This a Habit Rather Than a One Time Check
Since SSDs genuinely can fail with very little warning compared to mechanical drives, checking health once and forgetting about it defeats a lot of the purpose. Running CrystalDiskInfo or your manufacturer’s tool once every couple of months takes under a minute and gives you a running sense of the trend over time, which matters more than any single snapshot on its own.
If you’re the type who’d rather not remember to check manually, CrystalDiskInfo actually supports running automatically at startup with a system tray icon that changes color if anything concerning shows up, giving you a passive early warning system rather than something you have to remember to go check yourself.