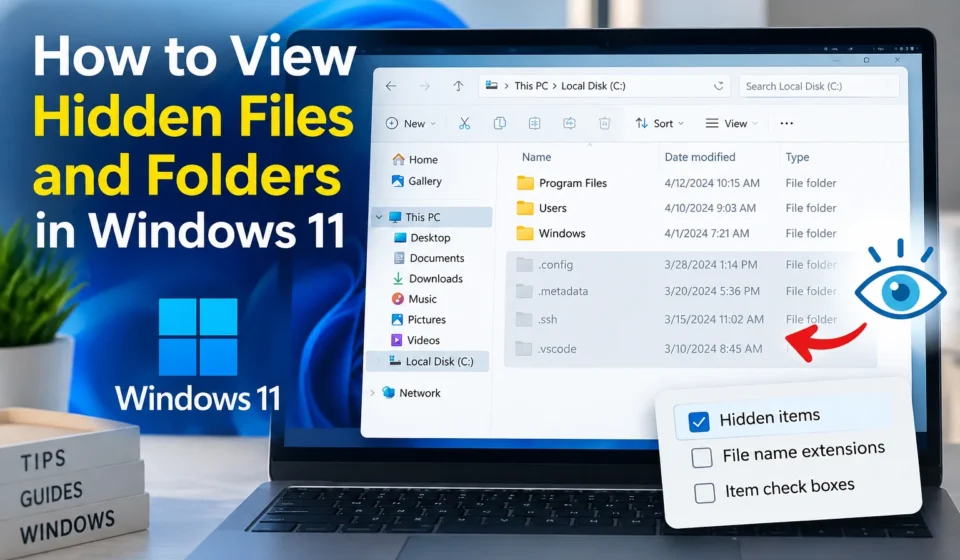

You’re digging around trying to find something, maybe a config file a program mentioned, maybe a folder a tech support article told you to check, and it’s just not there. Except it probably is. Windows hides a surprising number of files and folders by default, mostly to keep people from accidentally messing with system critical stuff, but that same protection gets in the way the moment you actually need to see what’s going on under the hood.
Turning on hidden files isn’t complicated, but there’s more nuance to it than the usual “click this checkbox” advice suggests, so let’s actually go through it properly.
Two Different Toggles, Not One
Here’s something that trips people up constantly: Windows 11 actually has two separate settings related to hidden files, and they’re not the same thing. One shows regular hidden files, stuff you or an app deliberately marked as hidden. The other shows protected operating system files, which is a much more sensitive category Microsoft keeps buried on purpose, since these are files that, if deleted or moved by accident, can genuinely break your Windows installation.
Knowing this distinction upfront saves a lot of confusion later, because turning on one doesn’t automatically turn on the other, and for most everyday purposes, you really only need the first one.
The Straightforward Way: File Explorer’s View Menu
This is the method most people end up using, and it’s genuinely quick once you know where it lives.
Open File Explorer, click the View menu at the top, hover over Show, and you’ll see Hidden items in the dropdown that appears. Click it, and just like that, every hidden file and folder becomes visible, shown slightly dimmed or grayed out compared to normal files so you can still tell the difference at a glance.
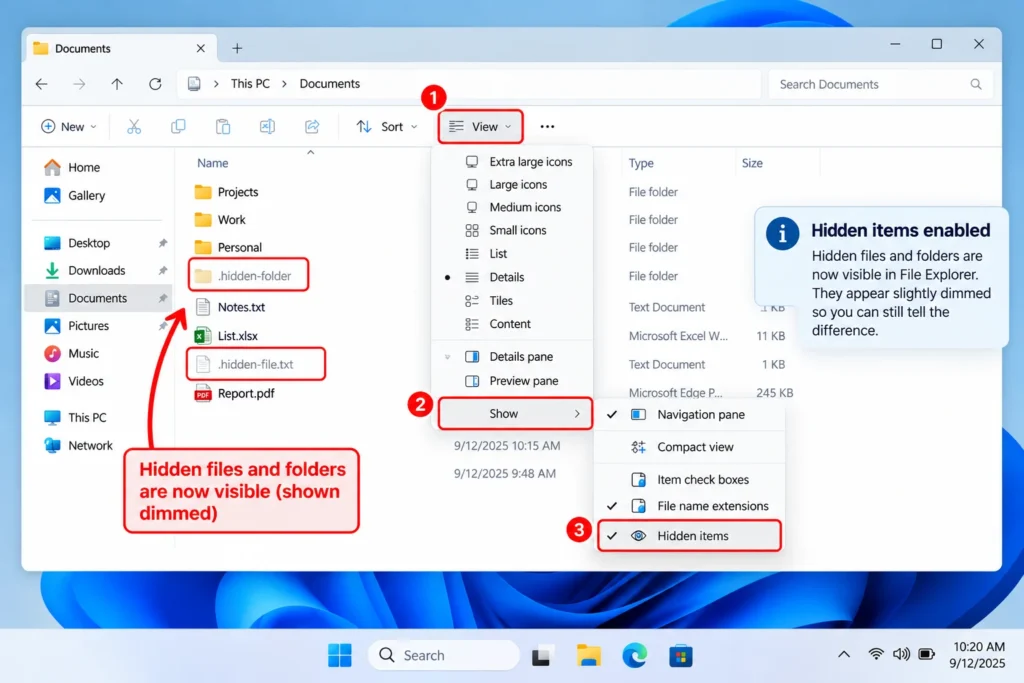
That’s it for regular hidden files. If you specifically need to see protected system files too, that requires digging one level deeper into Folder Options, which we’ll get to in a second.
Getting to Protected System Files
Since these are the files Windows really doesn’t want casually exposed, Microsoft buried this setting a bit further than the basic hidden items toggle.
Type “folder options” into the Start menu search and open it, or reach the same screen through File Explorer by clicking the three dot menu in the toolbar and selecting Options. Once you’re in Folder Options, click the View tab. Scroll down through the list of Advanced settings until you spot Hide protected operating system files, uncheck that box, click Apply, and confirm the warning Windows throws at you.
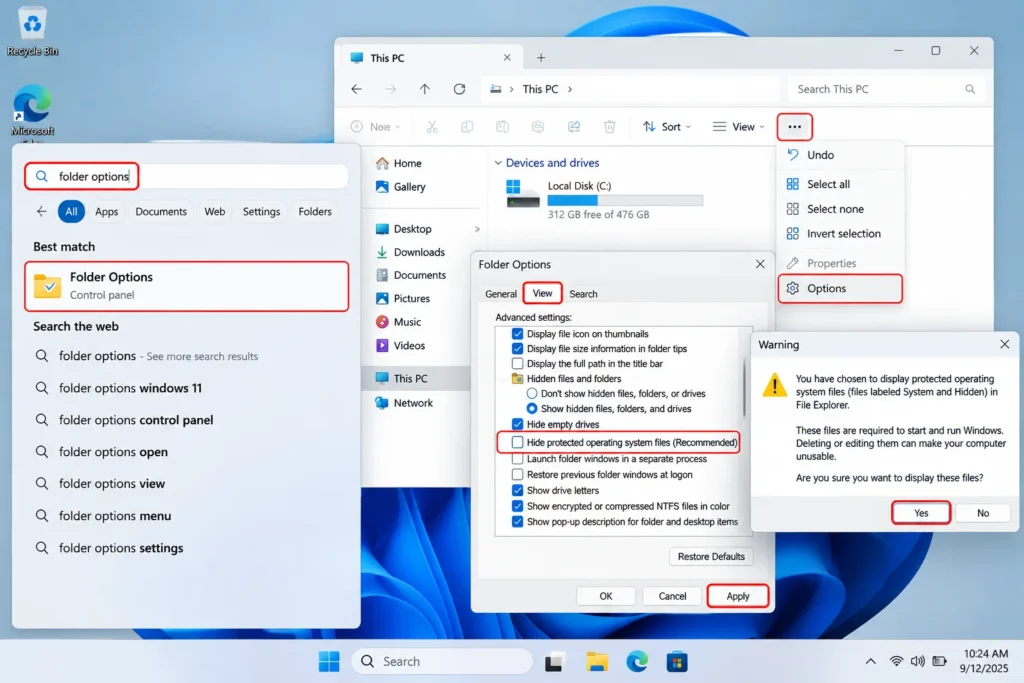
That warning isn’t just Microsoft being cautious for no reason. These files really do run core parts of your system, and accidentally deleting or moving one can cause boot problems or corrupt your installation. If you’re only after this setting because a tutorial told you to check a specific file, it’s worth turning it back on once you’re done rather than leaving it exposed indefinitely.
Doing It Through Command Prompt Instead
Not everyone wants to click through menus, and if you’re the type who’d rather type a command and be done with it, Command Prompt handles this just as well.
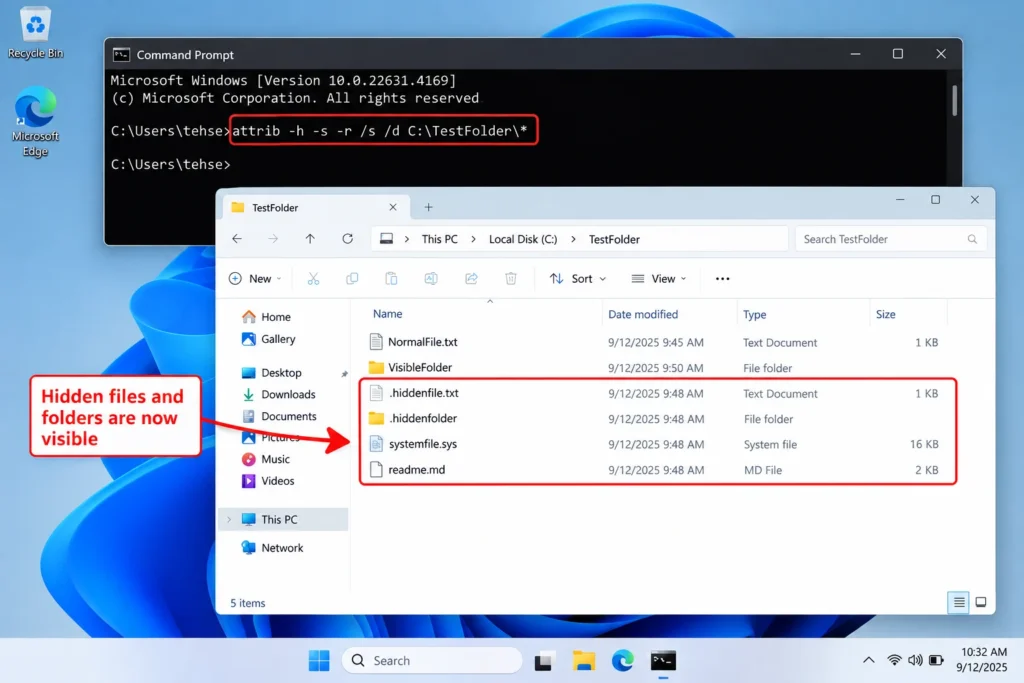
Open Command Prompt, either through the Start menu or by right clicking Start and selecting Terminal, and run:
attrib -h -s -r /s /d C:\path\to\your\folder\*
Replace the path with wherever you’re trying to reveal hidden files. This particular command removes the hidden, system, and read only attributes from every file and subfolder within that location, effectively unhiding everything in that folder tree at once. It’s a bit more aggressive than just toggling visibility, since this actually changes the file attributes themselves rather than just how File Explorer displays them, so use it deliberately rather than on your entire C: drive out of curiosity.
PowerShell If You Prefer It
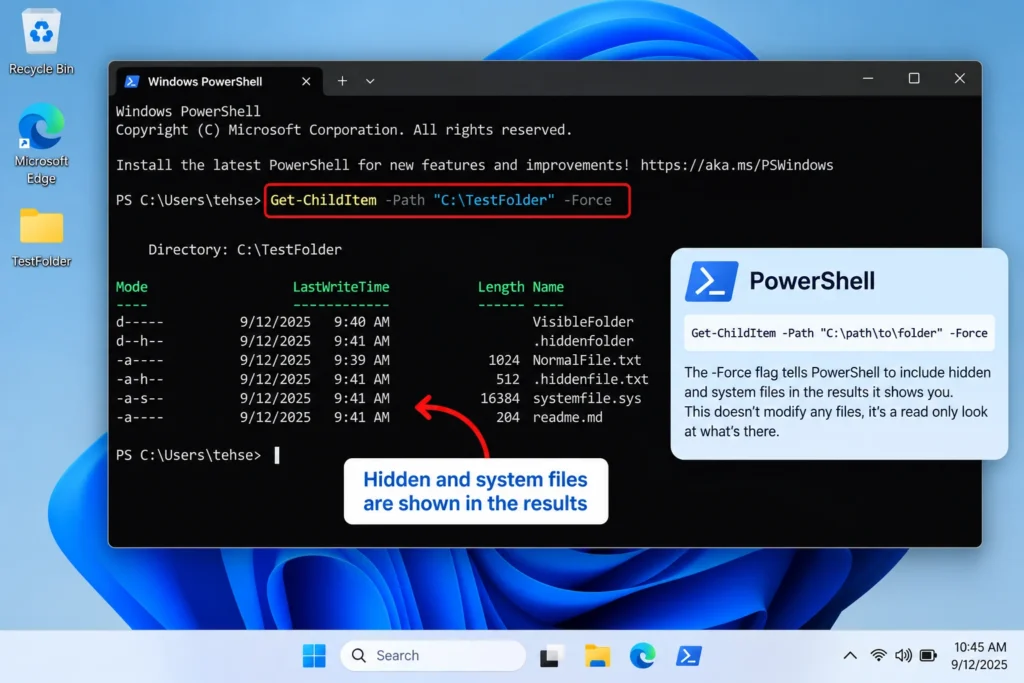
PowerShell offers a gentler alternative if you just want to see what’s hidden in a specific folder without changing any file properties at all.
Get-ChildItem -Path "C:\path\to\folder" -Force
The -Force flag tells PowerShell to include hidden and system files in the results it shows you. Unlike the attrib command above, this doesn’t actually modify anything, it’s a read only look at what’s there, which makes it a safer option if you just want to peek without risking any accidental changes to file attributes.
A Quick Note on Why This Matters More Than It Seems
It’s easy to think of hidden files as some obscure, rarely needed setting, but there are genuinely common situations where you’ll run into this. Installing certain software leaves configuration files hidden by default. Troubleshooting guides frequently ask you to locate files inside AppData, which is hidden by default specifically because most users never need to touch it. Recovering something after a virus or malware infection sometimes means checking whether files were simply hidden by the infection rather than actually deleted, a trick some malware still uses.
Understanding this setting isn’t just a one off party trick, it’s genuinely useful troubleshooting knowledge that comes up more often than people expect once they start paying attention.
Turning Hidden Files Back Off
Once you’ve found whatever you were looking for, you might want to switch things back to how they were rather than leaving everything visible permanently, especially since a cluttered file view with every hidden system file exposed isn’t exactly pleasant to browse day to day.
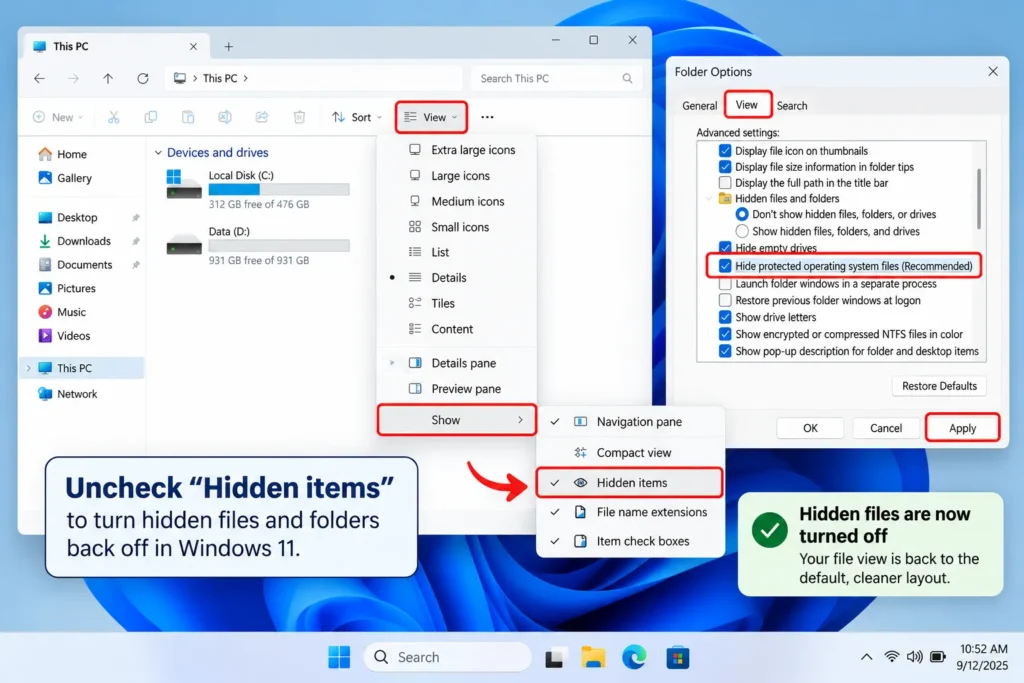
Just repeat the same steps in reverse: go back to View > Show in File Explorer and uncheck Hidden items, or head into Folder Options and re check the box for hiding protected operating system files if you’d turned that on too. There’s no harm in leaving hidden files visible if you genuinely prefer it that way, some people do, but for most users it’s worth restoring the default once your specific task is done.
Why Some Hidden Folders Still Won’t Show Thumbnails or Load Properly
Even after switching on Hidden items, you might notice certain folders, particularly ones tied to OneDrive syncing or specific apps, look empty or behave oddly, showing a generic folder icon instead of a proper thumbnail, or taking a moment to populate when you open them. This usually isn’t related to the hidden file setting at all. It’s often a sync status thing, where files exist as placeholders on your drive but haven’t actually been downloaded from the cloud yet, or a caching quirk where File Explorer hasn’t refreshed its view of that particular folder recently.
Pressing F5 to refresh, or closing and reopening File Explorer entirely, clears this up more often than people expect. If a folder genuinely seems stuck, right-clicking it and checking for a “Free up space” or “Always keep on this device” option ( common with OneDrive managed folders ) is worth doing before assuming something’s actually broken with your hidden files setting.
Hidden Files on External Drives and USB Sticks Work a Bit Differently
Worth knowing if you’re troubleshooting a flash drive rather than your main C: drive: files on removable media sometimes get hidden not by a deliberate setting, but by malware that specifically hides original files and replaces them with shortcuts, a trick that’s unfortunately still fairly common with infected USB drives passed between computers.
If you plug in a drive and it looks mostly empty despite you knowing it should have files, turning on Hidden items is the first step, but it’s also worth running a quick antivirus scan on that drive before digging further, since recovering “hidden” files in this specific scenario sometimes means dealing with an infection rather than just flipping a visibility setting. The attrib command mentioned earlier in this guide is actually the standard fix cybersecurity folks recommend for this exact situation, since it strips the hidden and system attributes malware applies to the original files.
Setting This Once Instead of Repeatedly
If you find yourself toggling hidden files on and off often enough that it’s becoming a minor annoyance, it’s worth knowing the setting does stick permanently until you change it again, it’s not something that resets on its own after closing File Explorer or restarting your PC. If it feels like it’s reverting, that’s more likely a sign a specific app or a Windows update reset your Folder Options back to default, which does occasionally happen after a larger system update.
For anyone who genuinely works with hidden files often enough that leaving them permanently visible makes sense, like developers or IT folks, there’s no downside to just leaving the setting on indefinitely rather than treating it as something to toggle each time.
A Small Detail About Dotfiles and Linux Style Hidden Files
If you’re using Windows Subsystem for Linux (WSL) or working across both Windows and Linux environments, it’s worth knowing that Linux’s hidden file convention, anything starting with a period like .gitconfig or .bashrc, doesn’t automatically get treated as hidden by Windows’ own file attribute system. These files can show up as regular, visible files in File Explorer even with hidden items turned off, since Windows and Linux use completely different underlying conventions for what counts as “hidden” in the first place.
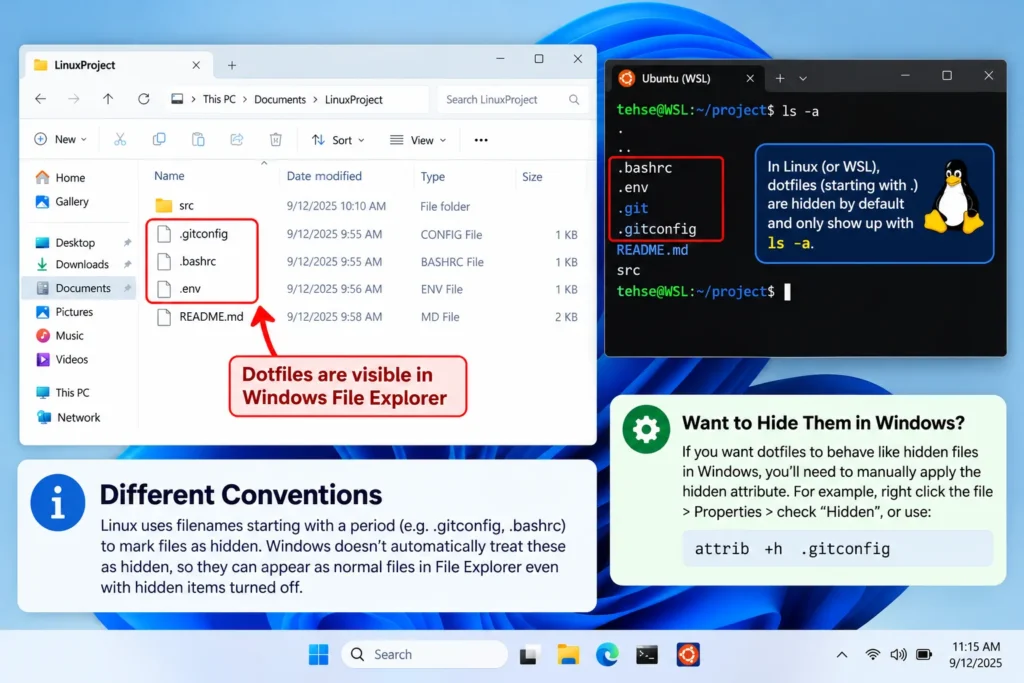
This occasionally confuses people jumping between the two systems, expecting a dotfile to behave the same way in File Explorer as it does in a Linux terminal. If you specifically need dotfiles to behave like proper hidden files within Windows itself, you’d need to manually apply the hidden attribute to them individually, since Windows won’t infer it just from the filename starting with a period.
One Thing Worth Double Checking
If you toggle the setting and hidden files still don’t seem to appear, it’s worth checking whether you’re looking in the right place entirely. Some folders, particularly certain system directories, require administrator permissions just to view their contents at all, separate from the hidden file setting itself. Running File Explorer as an administrator ( right click the File Explorer icon and select “Run as administrator,” or open an elevated Command Prompt if you’re using that method instead) sometimes resolves this when the regular visibility toggle alone doesn’t seem to be doing anything.